|
|
Post by cusqueno on Dec 7, 2015 22:54:13 GMT
|
|
|
|
Post by kickstandman on Dec 8, 2015 4:21:56 GMT
Very nice, cheers. It will be nice to fix up or ride as is.
|
|
|
|
Post by cusqueno on Dec 8, 2015 15:11:13 GMT
It is in good condition, but I'm not sure if the grey/silver has weathered or been polished too enthusiastically. I like the way it's painted, which with the integrated seat clamp suggests an early Aerospace. Also the good Nisi clincher rims, Viscount hubs and Viscount QRs, stem and brakes. I bought it off GumTree in Brighton for £80 - about the limit for me for a bike without derailleurs &c and with straight bars. Unfortunately the seller bought it like that, so the missing parts are lost. But I'm pleased with it and Mrs C enjoyed a couple of hours in Brighton. I'm thinking I might build it up with my 1st gen black Dura Ace parts as a sort of Supa Bike. Could look quite good - what does Bendo think? There's an SKF branded BB bearing with plastic cups - not sure if the BB shell has been threaded or if it's a threadless one. And there's a black headset. Looks quite good, but I can't see a brand on it. Last view, from the rear. Lacks a Viscount seat clamp bolt. Perhaps I have one somewhere. Attachments:
|
|
|
|
Post by 54roadie on Dec 8, 2015 23:56:51 GMT
Only £80? Nice score. I'll bet that SKF unit is top notch. Please let us know?
Frank
|
|
|
|
Post by kickstandman on Dec 21, 2015 5:24:36 GMT
My Nisi Evian rear rim lost a spoke, I think I have a replacement ready. So, I read a few posts and it sounds like this was a type of wheel oem on some of the Viscounts, at least apparently Aerospaces. From a random web pic, I think the rim has the blue sticker, not of course, the other one. Anyway, it's no big deal except I was unsure if this was originally included on the Viscount and yes, I read the 6 posts or so here that mention Nisi.  |
|
|
|
Post by busaste on Dec 30, 2015 19:47:33 GMT
I'm thinking I might build it up with my 1st gen black Dura Ace parts as a sort of Supa Bike. Could look quite good - what does Bendo think? Would look spectacular! Plus, it's always nice to see a 'fixed' Viscount being 'unfixed'!! Has the frame got a threaded BB or is it one of those Prestine/Mavic/etc. threadless ones? Regards Steve |
|
|
|
Post by cusqueno on Dec 30, 2015 22:37:42 GMT
Tried to get the cranks off today. As you might expect, the extractor threads stripped. Since the SKF bb 'cups' are plastic, there's nothing firm to get a purchase against - for instance with wedges. Thinking about this. Any ideas? I don't want to do anything destructive without knowing what the bb is.
|
|
|
|
Post by 54roadie on Jan 12, 2016 7:11:19 GMT
Try a two or three prong bearing puller, probably a small one. You'll want to put a pretty thick (2mm or more) disk of some sort inside the crank arm, against the spindle, to keep the puller tip from distorting anything. But the disk has to be small enough diameter to fit easily into the arm. Then the puller prongs fit against the back of the crank arm, the tip will screw tight against the disk. At that point it's a crank puller. Works exactly the same way. Good luck. You may want also to check and perhaps protect the back of the arm if the prongs are shaped so that they will dig, rather than lay flat.
Frank
|
|
|
|
Post by cusqueno on Apr 2, 2016 20:49:18 GMT
I finally gave up trying to remove the cranks on this bike. The puller threads on the cranks stripped and I couldn't shift them with a bearing puller. So I cut through the spindle on the non drive side with my Dremel. Only to find that the SKF bb with plastic cups had been glued in, presumably with epoxy resin like Araldite. I suppose it was easier than tapping the shell for an Italian thread bb. But it was very difficult to remove, involving the Dremel, a hack saw, an electric drill, an old screwdriver used as a cold chisel and my second best hammer. I finally got the spindle out and found it had integral ball races, not the cup & cone type, running in a hardened steel tube. The tube is still stuck in by the plastic cups and Araldite, despite applying the kitchen blow lamp. So, as if the usual idiosyncrasies of Viscounts are not enough, someone has dreamt up a new horror.
|
|
Jem
Viscount
 ?
?
Posts: 3,390 
|
Post by Jem on Apr 6, 2016 15:42:56 GMT
I finally gave up trying to remove the cranks on this bike. The puller threads on the cranks stripped and I couldn't shift them with a bearing puller. So I cut through the spindle on the non drive side with my Dremel. Only to find that the SKF bb with plastic cups had been glued in, presumably with epoxy resin like Araldite. I suppose it was easier than tapping the shell for an Italian thread bb. But it was very difficult to remove, involving the Dremel, a hack saw, an electric drill, an old screwdriver used as a cold chisel and my second best hammer. I finally got the spindle out and found it had integral ball races, not the cup & cone type, running in a hardened steel tube. The tube is still stuck in by the plastic cups and Araldite, despite applying the kitchen blow lamp. So, as if the usual idiosyncrasies of Viscounts are not enough, someone has dreamt up a new horror. That sounds like either a terrible nightmare I once had, or a lost short story from Albert Camus (set in Algeria in a bike shop), or a lost scene from Eraserhead. Either way, I send my wholehearted respect for sticking at it. Horror is not too much of a word for it. |
|
|
|
Post by bicyclebits on Apr 8, 2016 20:19:07 GMT
cusqueno-
It is amazing how a quick and easy job on one's bike rapidly escalates into a full on horror show. Good luck with the repairs.
|
|
robt
Viscount
Posts: 559
Member is Online
|
Post by robt on Apr 9, 2016 10:35:19 GMT
John,
I have a crank arm with the 5-stud mounting but no chain ring that Ray gave me at DFR3. If that would allow you to make use of the porthole chainring, you're welcome to it. Let me know if you're interested and I'll post a picture.
|
|
robt
Viscount
Posts: 559
Member is Online
|
Post by robt on Apr 16, 2016 20:26:41 GMT
I finally gave up trying to remove the cranks on this bike. The puller threads on the cranks stripped and I couldn't shift them with a bearing puller. So I cut through the spindle on the non drive side with my Dremel. Only to find that the SKF bb with plastic cups had been glued in, presumably with epoxy resin like Araldite. I suppose it was easier than tapping the shell for an Italian thread bb. But it was very difficult to remove, involving the Dremel, a hack saw, an electric drill, an old screwdriver used as a cold chisel and my second best hammer. I finally got the spindle out and found it had integral ball races, not the cup & cone type, running in a hardened steel tube. The tube is still stuck in by the plastic cups and Araldite, despite applying the kitchen blow lamp. So, as if the usual idiosyncrasies of Viscounts are not enough, someone has dreamt up a new horror. John, I have started to tidy up an A/S400 today that my friends at the Birmingham Bike Foundry had hanging up in the back of the shop. Here is a picture as I received it: 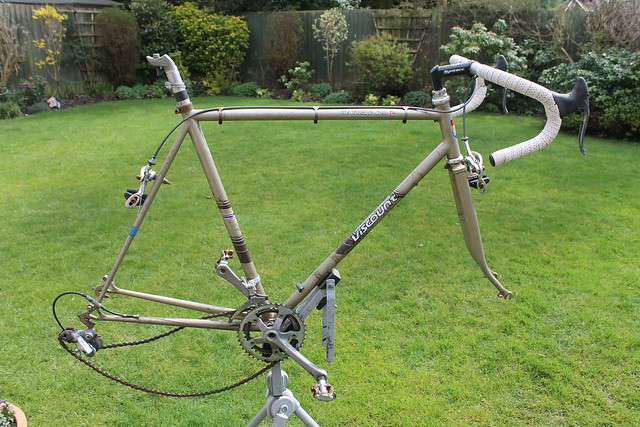 IMG_4339 IMG_4339 by RMT@261, on Flickr It has obviously had some modifications along the way - chainset, RD, brakes, stem etc. Most of the small bits came off OK, including the 42/36T Shimano RSX crankset. The seatpost and stem are currently soaked in penetrating oil. I have had a go at removing the sealed B/B, but have only managed to shatter parts of the plastic locking collar. Do you know if threaded/sealed unit B/Bs were ever fitted into Aerospace frames at the factory? If not, I may have another 'upgraded' Araldited B/B like yours, that I might just leave alone as it doesn't turn too roughly. |
|
|
|
Post by cusqueno on Apr 18, 2016 9:04:31 GMT
I haven't heard before of threaded sealed bb units being factory fitted to unthreaded shells with the benefit of Araldite and it seems rather a bodge, if effective. But all things are possible on Planet Viscount. However, my frame looks to be older than yours, with an integral seat tube clamp, rather than a separate band. The bike also came with Viscount branded bits that later Aerospace bikes wouldn't have had - chain set, stem, brakes and wheels. If a sealed bb unit was available in the first couple of years of the '80s, although I doubt it somewhat, I'm pretty sure they weren't available in the mid-'70s. So my conclusion is that they were later 'up-grades'.
Perhaps I should have left well alone. The bearings seemed very smooth, but I wanted to get the cranks off (couldn't and still can't, even with direct application of a lump hammer to the remains of the spindle!) and change the bb.
Your frame looks promising. I'm now up to N+2 or N+3 (depending on how you ware counting) as I've just bought another fillet brazed Viscount Aerospace frame, (eBay UK number 351699127677) almost by accident. I just thought "would he take £25" and he did. I own three similar frames without any settled plans as to what tho build them into, not including the one above. Ideally, they would all be re-painted. Perhaps there's a painter that does 3 for two deals??
|
|
robt
Viscount
Posts: 559
Member is Online
|
Post by robt on Apr 18, 2016 19:05:34 GMT
I do wonder if we brought all of our 'project' frames to DFR4, we'd have enough to fill an industrial electrostatic powder coating unit? We'd all have to agree on the same colour, though! The handlebar stem came out of the A/S 400 after a good soaking with PlusGas, so there's just the seatpost left to work on  . The BB is resolutely staying put. I think I'll settle for a good scrub and polish for this one, as I still haven't built up my re-sprayed Sport and Sebring frames yet. Less than 12 weeks to finish them before the 8th July! As a taster for DFR4, here's the Sebring frame I have had since 1976, now brought 'up to date' with the broken drive side chain stay sleeved and brazed, bosses for gear levers, bottle cage & rear rack plus top tube brake cable guides and a rear brake bridge brazed on before painting in Ruby Red and Orchid White and applying the decals from Velocals prior to the lacquer coat going on. That was all done by Fin and Matt at the Birmingham Bike Foundry, but I built the new front wheel resting on the wall behind it, using the original hub, a Rigida rim and NOS nickel-plated spokes both sourced from Bankrupt Bike Parts. Headset and fork arrangements are work in progress at the moment, but the original b/b axle and cups went back in OK last weekend. 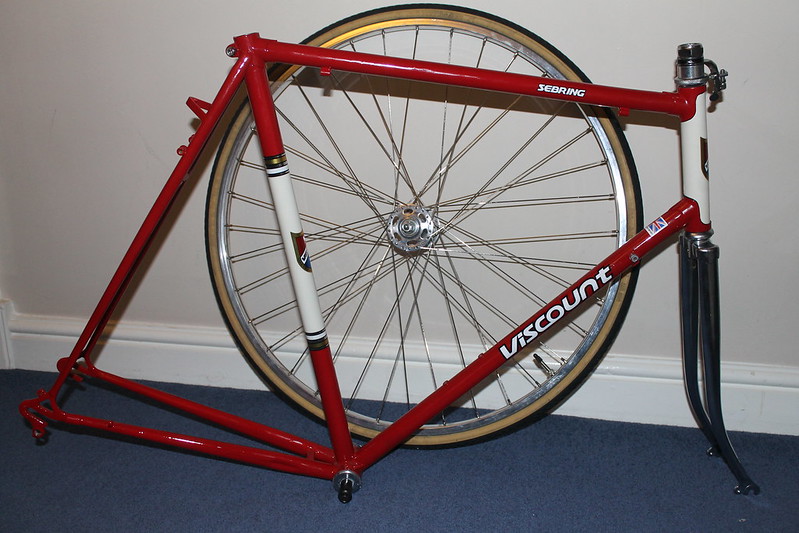 IMG_4360 IMG_4360 by RMT@261, on Flickr |
|
Jem
Viscount
?
Posts: 3,390
|
Post by Jem on Apr 18, 2016 19:55:28 GMT
That Sebring looks great Rob!
|
|
|
|
Post by jdl51 on Apr 18, 2016 22:41:53 GMT
Nice!
|
|
|
|
Post by triitout on Apr 19, 2016 1:36:39 GMT
Love it when old things become new again. Great job Robt!
|
|
|
|
Post by triitout on Apr 19, 2016 1:43:13 GMT
I finally gave up trying to remove the cranks on this bike. The puller threads on the cranks stripped and I couldn't shift them with a bearing puller. So I cut through the spindle on the non drive side with my Dremel. Only to find that the SKF bb with plastic cups had been glued in, presumably with epoxy resin like Araldite. I suppose it was easier than tapping the shell for an Italian thread bb. But it was very difficult to remove, involving the Dremel, a hack saw, an electric drill, an old screwdriver used as a cold chisel and my second best hammer. I finally got the spindle out and found it had integral ball races, not the cup & cone type, running in a hardened steel tube. The tube is still stuck in by the plastic cups and Araldite, despite applying the kitchen blow lamp. So, as if the usual idiosyncrasies of Viscounts are not enough, someone has dreamt up a new horror. That sounds like either a terrible nightmare I once had, or a lost short story from Albert Camus (set in Algeria in a bike shop), or a lost scene from Eraserhead. Either way, I send my wholehearted respect for sticking at it. Horror is not too much of a word for it. John, I've found myself purposely saying "It's working pretty good...considering.... Best I don't mess with it for fear of going down the horror road you so aptly describe. Your nightmare at the very least is a teaching lesson for those who presume to boldly go where no man has gone before! |
|
|
|
Post by oldroadietehachapi on Apr 19, 2016 4:57:30 GMT
As a taster for DFR4, here's the Sebring frame I have had since 1976, now brought 'up to date' with the broken drive side chain stay sleeved and brazed, bosses for gear levers, bottle cage & rear rack plus top tube brake cable guides and a rear brake bridge brazed on before painting in Ruby Red and Orchid White and applying the decals from Velocals prior to the lacquer coat going on. That was all done by Fin and Matt at the Birmingham Bike Foundry, The frame looks great! Jim |
|
|
|
Post by cusqueno on Apr 20, 2016 20:49:18 GMT
Someone has just posted a moan about plastic SKF bb units on the Steel is Real FB page. Seems they are difficult to remove even when not stuck in with Araldite.
|
|
|
|
Post by oldroadietehachapi on Apr 21, 2016 4:38:45 GMT
I finally gave up trying to remove the cranks on this bike. The puller threads on the cranks stripped and I couldn't shift them with a bearing puller. So I cut through the spindle on the non drive side with my Dremel. Only to find that the SKF bb with plastic cups had been glued in, presumably with epoxy resin like Araldite. I suppose it was easier than tapping the shell for an Italian thread bb. But it was very difficult to remove, involving the Dremel, a hack saw, an electric drill, an old screwdriver used as a cold chisel and my second best hammer. I finally got the spindle out and found it had integral ball races, not the cup & cone type, running in a hardened steel tube. The tube is still stuck in by the plastic cups and Araldite, despite applying the kitchen blow lamp. So, as if the usual idiosyncrasies of Viscounts are not enough, someone has dreamt up a new horror. I have repeatedly tried to visualize this horror story. I take it some fine mechanic glued in a plastic cupped SKF BB using epoxy; that makes me sick. Can you chip or pry it out? Perhaps a machine shop with a mill or boring machine can clean it out; it would have to be precise. What an expensive nightmare. Have you found a solution or given up? Cheers Jim |
|
|
|
Post by oldroadietehachapi on Apr 21, 2016 15:40:53 GMT
I contacted my brother who has a background in using composites in aerospace and race cars. He suggests a boring bar on a mill. Also a somewhat hazardous, do it yourself procedure. Try it first without soaking in acetone (much safer); if that fails, then try the entire procedure.
Soak the area in acetone for at least an hour. Epoxy softens with heat, heat the area with a propane torch to around 400 degrees F (an industrial heat gun may be up to the job and is safer). Remove excess acetone before heating. Important, blow out the frame tubes with air to remove acetone vapors. Yes the acetone will burn and fire may come out of the tubes and you may even have a small explosion, so be careful (fun isn't it). Do not overheat the metal (metal glows red) as it will harm the heat treating of the metal. When hot you may be able to beat the tube through the bottom bracket shell. Additional heating may allow removing some of the residual epoxy. The rest may have to be sanded out.
Good Luck
Jim
|
|
|
|
Post by dracco on Apr 21, 2016 16:19:20 GMT
Soaking in acetone is difficult. You can't just squirt some on and leave it for an hour, since it is very volatile and will evaporate in minutes. You'd need to submerge the BB in a bath of acetone (preferable sealed in some way to prevent evaporation). You don't want to do this at home, or in an enclosed space since (I) acetone is also highly flammable, and there would be a very high fire risk and (II) you don't want to be breathing the fumes, either.
If you're trying to dissolve the adhesive, then chloroform might be better (!) since at least it's non-flammable. But it also evaporates rapidly and you don't want to breathe those fumes, either. (I use chloroform for degreasing parts, but I work in a lab with a fume cupboard!).
|
|


 . The BB is resolutely staying put. I think I'll settle for a good scrub and polish for this one, as I still haven't built up my re-sprayed Sport and Sebring frames yet. Less than 12 weeks to finish them before the 8th July!


