|
|
Post by brianbutler on Jan 11, 2023 15:29:21 GMT
I recently converted a 1970 Dawes Galaxy to a freewheel single speed for winter use on roads and trails. The original idea was to reduce cleaning and maintenance while the roads and bike trails are wet, salty, and dirty. It turns out to be fun rider with a 40/18=60 inch gear, good for locals hills althiough a bit too low for downhill and flat stretches. I have a 16T cog that I will probably install, bringing the gear up to 67.5 inches.
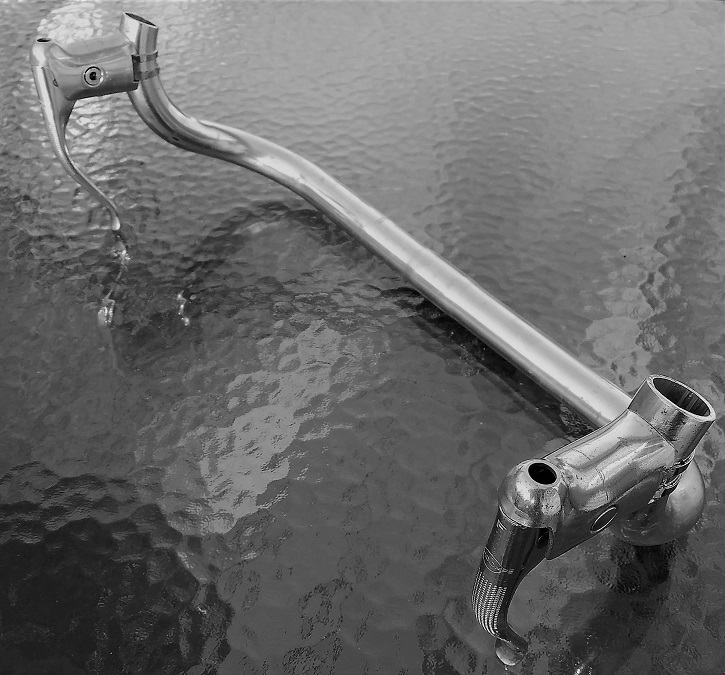
I like it enough that I plan to convert one of my three red and white Viscount Aerospace GP's. This time I am aiming for something more dramatic. I plan to preserve the porthole chain ring and install a bullhorn handlebar made from a reversed/chopped drop bar:
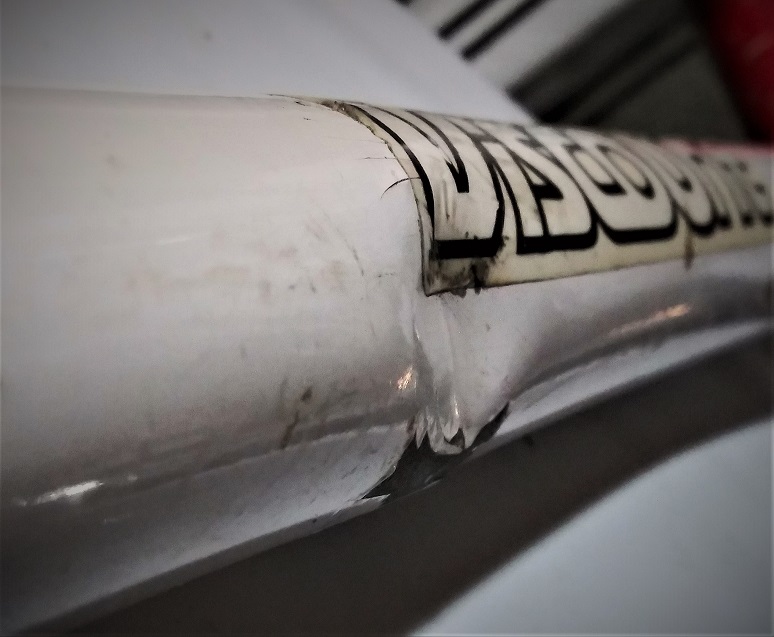
I disassembled the target Viscount, which I got for free and refurbished four or 5 years ago. Unfortunately I rediscovered a few problems that did not make much difference in the original refurbishment, but scare me when I contemplate the greater stresses on a single speed, primarily while climbing hills out of the saddle. The first problem is a fairly serious dent in the middle of the down tube, which also left the tube slightly bent:
There is also a handlebar problem. At some point someone drilled rather large holes in the tube to accommodate internal cabling. The size and location of these holes might compromise the strength of the bar.
Then there is the matter of the original grooved bottom bracket, reportedly known sometimes to snap under load. Ditto Viscount pedals.
So my plan is the following:
1. Discard the frame and use one of the others. I don't like scrapping a Viscount frame but this one seems gone. I previously scrapped a blue and white Aerospace frame that was cracked and I got over it.
2. Discard the drilled handlebar and use the bullhorn bar shown above, made from a Japanese drop bar.
3. The frame I might use already has a freshly pressed "Wheelson Hack" BB. I can also apply the same hack to a third (slightly too large) frame, or use a lugged Aerospace Lambert frame (also a bit too large) with a threaded BB.
4. Replace the pedals with something from my stash, like MKS Sylvan touring pedals.
5. I will attempt to use the porthole chainring but the TA crankset doesn't provide many options for placement of the big chain ring, so chain line might be a problem, especially since I will use a 20T cog on the back (for a 70 inch gear) and it has to clear the chain stay but be far enough right to line up with the porthole.
I have a project to work on and a single speed to ride in the interim.
Brian
|
|
|
|
Post by wheelson on Jan 11, 2023 17:58:02 GMT
Great idea, Brian. I’ve given this some thought as well, especially since the owner of the shop I contract with created a single speed for commuting this last year. With a 30 rolling mile one way, I take my hat off to him!
As far as using a porthole ring, have you thought about cutting the teeth off and using it for a chain guard/base for other rings? I did this on one of my Viscounts. If you or anyone needs a tooth-worn porthole ring I have several extras that are free for the asking.
Best,
John “wheelson”
|
|
|
|
Post by brianbutler on Jan 11, 2023 19:04:01 GMT
Great idea, Brian. I’ve given this some thought as well, especially since the owner of the shop I contract with created a single speed for commuting this last year. With a 30 rolling mile one way, I take my hat off to him! As far as using a porthole ring, have you thought about cutting the teeth off and using it for a chain guard/base for other rings? I did this on one of my Viscounts. If you or anyone needs a tooth-worn porthole ring I have several extras that are free for the asking. Best, John “wheelson” That is a good idea and I remember you mentioned it here a while ago. I'll see if I can make the 52/20 setup work and, if not, I might take you up the offer of a worn porthole. Right now I am mulling a lot of options for this project. The main criteria are using one of my Viscount frames and ending up with something that looks cool and is safe to ride hard. The Wheelson Hack provides a good way to change horizontal spacing just by selecting a wider or narrower cartridge BB for the donor. I should have the 20T freewheel here in a couple of days and then I can take some real measurements.
Yeah, 60 miles round trip on a single speed is a lot. I've been out on a fairly flat 32 miler and a 20 miler with a few 7.5% grades and they were both vigorous workouts. It is certainly a different ride than staying in the saddle and maintaining a constant cadence. Physics says the overall work is the same but my legs beg to differ.
Brian
|
|
|
|
Post by brianbutler on Jan 11, 2023 20:56:33 GMT
John, now that I think about it, how do you cut the teeth off of a chainring?
Brian
|
|
|
|
Post by wheelson on Jan 11, 2023 21:15:13 GMT
A friend on the CR list did one for me as part of a parts trade. As I recall, he told me that he snapped the teeth off with pliers (Vise grips?), then finished it off with a grinder and belt sander. A rather tedious blacksmithing job but the finished ring was really nice. I’ll send you one for your amusement!
Best,
John “wheelson”
gggrandson of Blacksmith Jimmy Morrison
|
|
|
|
Post by brianbutler on Jan 11, 2023 21:36:49 GMT
OK, thanks. I'll probably end up using it on the single speed project. The more I look at the chain geometry, I think I will have to use the inner chainring. I have a 42, maybe some others as well. Then I could use a smaller and more available 16/17/18T freewheel, and maybe even a flip flop hub and fixed gear.
One thing I really like about the single speed is the absolute silence of the bike. I only hear the tires on the street.
Brian
|
|
|
|
Post by brianbutler on Jan 13, 2023 21:05:13 GMT
This project is coming along faster than I expected. I guess it is easier to take things off than put them on and adjust them!
I am using the 52T porthole chain ring by itself and a 20T freewheel on the rear. The chain ring is 7mm clear of the stay, as is the freewheel cog and body. I had to "undish" the rear wheel completely and still need 3mm spacing on the freewheel threads for a perfect chain line. I am wondering which of these I should do:
1. Leave it as is - very strong symmetrical wheel but 3mm of hub thread unused.
2. Reverse dish the wheel another 3mm and thread the freewheel fully onto the hub. This has the advantage of better seating of the freewheel but a weaker wheel (on the drive side no less.)
3. Leave the wheel symmetrical, remove the hub spacers and try to get the chain ring 3mm left by tinkering with the bottom bracket, which is a "Wheelson hack." I can't remember what width of cartridge BB I used but I can measure and possibly redo the BB with a shorter spindle (6mm shorter I guess). Based on laziness, this is the least attractive option because it involves taking everything apart, buying a cartridge, and building a new BB with it.
I'm interested in any insights or suggestions anyone has.
Brian
|
|
|
|
Post by oldroadietehachapi on Jan 13, 2023 23:08:56 GMT
I am following your project with interest. I have little to contribute as, since 1960, I have not had a bike with only one speed.
Best
Jim
|
|
|
|
Post by brianbutler on Jan 14, 2023 2:00:14 GMT
I am following your project with interest. I have little to contribute as, since 1960, I have not had a bike with only one speed. Best Jim Neither have I, and if I make a fixie I'll have my first two-speed, one forward and one reverse.
BTW, I opted to screw the freewheel all the way on, move the hub right, and re-dish the wheel. Already done.
Brian
|
|
|
|
Post by wheelson on Jan 14, 2023 13:38:16 GMT
Fixed gear is pretty neat if one can handle th lack of gearing or if the terrain is not more than a little hilly. I’ve seen a fixed/free setup where the single speed freewheel was geared low enough to handle hilly parts of the route. One can’t deny that the clean uncluttered lines of a fixed gear bike looks really neat.
Best,
John “wheelson”
|
|
|
|
Post by oldroadietehachapi on Jan 14, 2023 14:52:59 GMT
Brian said "BTW, I opted to screw the freewheel all the way on, move the hub right, and re-dish the wheel. Already done."
This brings up a great gap in my mechanic skills, wheel building. I have never done much more than truing wheels. Adjusting the dish sounds easy enough, so long as you don't have to change spokes. I once made a small adjustment in dish by alternating quarter turn adjustments to the spokes. That said, how much can you adjust the dish without changing the spokes?
Cheers Jim
|
|
|
|
Post by wheelson on Jan 14, 2023 17:32:48 GMT
Jim, that would depend on a couple of things. Most modern rear wheels are built with different length spokes on the drive side vs the non-drive side. This is because the tension differential would be too great for dishing the modern wheel, and the increasingly modern rear hub widths. The DS is usually 2 or more mm shorter. For older wheels, 5 to maybe 7 speed, the same length spokes were typically used, with about 4 turns of the nipple on the DS being enough to get the dish in the ballpark. So adjusting the dish on older wheels is usually not a problem. Just watch the heads of the nipples in case overly long spokes were used and the spoke adjustments might cause the spoke to protrude through the rimstrip. Just take it slow and don’t make any huge changes to avoid a taco’ed wheel.
Best,
John “wheelson”
|
|
|
|
Post by oldroadietehachapi on Jan 14, 2023 18:35:39 GMT
Good info John! I have a couple of wheelsets with old high flange hubs. They have tubular rims and I would like to convert at least one set to clincher. Finding polished rims seems difficult, not to mention determining spoke length. These little complications have thus far made it easier to simply buy another wheelset. This seems little more expensive than rims and spokes. Perhaps someday.
All the Best
Jim
|
|
|
|
Post by brianbutler on Jan 14, 2023 19:43:05 GMT
As John said, on the older bikes with close spaced flanges and tall rims, the difference in right/left spoke length is usually not an issue. You can think of the spoke length as the hypotenuse of a triangle, the other sides being the distance from either flange to the center between dropouts, and the distance from the hub to the rim, which is constant and about 295mm on a old 27" wheel laced cross 3. In the case I just worked on, the hub flanges are 56mm apart and the wheel started out exactly centered. So initially my spoke length was sqrt(28^2 + 295^2) = 296.3mm. And in fact I think I am using 296mm spokes. I moved the hub right 5mm by rearranging cones and spacers, and then dished the rim left 5mm so it would be centered in the frame. That means my left and right spokes should now be sqrt(23^2 + 295^2) = 295.9mm, and sqrt(33^2 + 295^2) = 296.8mm, respectively. There is less than a millimeter difference between the ideal spoke lengths, not enough to worry about.
With a large distance between flanges or especially a smaller wheel, the effect of dishing on spoke length is magnified.
Brian |
|
|
|
Post by wheelson on Jan 14, 2023 23:12:53 GMT
Swapping tubular to clincher is not horribly difficult if you can find clincher rims with the same profile as they’re both 700c. If you can reuse the spokes, you’re considerable money ahead. I have no qualms with reusing spokes if they’re unmarked and preferably stainless. I almost always replace the spoke nipples. Tape the old wheel to the new rim in the same orientation (valve hole). Loosen but don’t remove the nipples from all the spokes. Then move the spokes over on one side, tightening each nipple only a few turns. Flip the wheel and repeat the other side. Then untape and continue with new wheel, run each nipple to hide the last spoke thread. Continue, tightening the nipples one or turns around the wheel, remembering to tighten the drive side 3-4 turns more. Get the feel of a “good” wheel with respect to tensioning. Flip the wheel in the frame to check dish centering. Not simple but doable and pretty satisfying. Takes patience, though. I expect there are YouTube videos out there as well.
Best,
John “wheelson”
|
|
|
|
Post by wheelson on Jan 14, 2023 23:17:57 GMT
Oh yes, a drop of purple (mild) Loctite on each spoke thread (one at a time) serves as both a lubricant and a lock.
Best,
John “wheelson”
|
|
|
|
Post by oldroadietehachapi on Jan 15, 2023 14:08:33 GMT
Swapping tubular to clincher is not horribly difficult if you can find clincher rims with the same profile as they’re both 700c. If you can reuse the spokes, you’re considerable money ahead. I have no qualms with reusing spokes if they’re unmarked and preferably stainless. I almost always replace the spoke nipples. Tape the old wheel to the new rim in the same orientation (valve hole). Loosen but don’t remove the nipples from all the spokes. Then move the spokes over on one side, tightening each nipple only a few turns. Flip the wheel and repeat the other side. Then untape and continue with new wheel, run each nipple to hide the last spoke thread. Continue, tightening the nipples one or turns around the wheel, remembering to tighten the drive side 3-4 turns more. Get the feel of a “good” wheel with respect to tensioning. Flip the wheel in the frame to check dish centering. Not simple but doable and pretty satisfying. Takes patience, though. I expect there are YouTube videos out there as well. Best, John “wheelson” I must try this. Can you clarify a few points? "Then move the spokes over on one side" I am surprised the spokes are long enough to reach the new rim. Does it matter which side you start with? I suppose you would first move the spokes from the side of the hub that is nearest the new rim? I am still amazed that the spokes will reach from the side of the hub farthest from the new rim. Am I getting this wrong? Wish you had a picture.
Edit
All the Best Jim
|
|
|
|
Post by brianbutler on Jan 15, 2023 21:22:30 GMT
Swapping tubular to clincher is not horribly difficult if you can find clincher rims with the same profile as they’re both 700c. If you can reuse the spokes, you’re considerable money ahead. I have no qualms with reusing spokes if they’re unmarked and preferably stainless. I almost always replace the spoke nipples. Tape the old wheel to the new rim in the same orientation (valve hole). Loosen but don’t remove the nipples from all the spokes. Then move the spokes over on one side, tightening each nipple only a few turns. Flip the wheel and repeat the other side. Then untape and continue with new wheel, run each nipple to hide the last spoke thread. Continue, tightening the nipples one or turns around the wheel, remembering to tighten the drive side 3-4 turns more. Get the feel of a “good” wheel with respect to tensioning. Flip the wheel in the frame to check dish centering. Not simple but doable and pretty satisfying. Takes patience, though. I expect there are YouTube videos out there as well. Best, John “wheelson” I must try this. Can you clarify a few points? "Then move the spokes over on one side" I am surprised the spokes are long enough to reach the new rim. Does it matter which side you start with? I suppose you would first move the spokes from the side of the hub that is nearest the new rim? I am still amazed that the spokes will reach from the side of the hub farthest from the new rim. Am I getting this wrong? Wish you had a picture.
All the Best Jim
Jim, I'm not ignoring your question but I have never done a "live swap." I wanted to mention a couple of things about spoke length.
First, I found that the Weinmann LP18 27" (not 700C) rims are good substitutes if you like their style. The manufacturer's stated Effective Rim Diameter (ERD) is identical to what I measured on a set of Birmalux tubular rims, therefore the existing spokes worked when laced the same way (standard cross 3).
You can find out about measuring ERD here:
The manufacturer normally gives the ERD of new rims in the specification.
You might want to try making the new wheel from scratch instead of transferring. It's a little confusing at first, but there are pretty good instructions online and you have plenty of other wheels to consult if necessary. Alternatively, I should probably try the transfer method.
I use the Park dishing tool so I can do it on the truing stand, and also the Park spoke tension gauge to get some idea about spoke tension.
Wheel building is fun!
Brian
|
|
|
|
Post by wheelson on Jan 15, 2023 21:25:17 GMT
Most of the time the spokes will reach on the first side IF you loosen all the spokes on the old wheel. I like to use the longer 16mm nipples which helps. If you can’t make the second side reach, mark the first pair locations on the new rim, then tie the spokes at the cross and remove all the remaining spokes since you’ve already defined the pattern. Again, the rims must be nearly identical in profile. I very seldom use this method anymore, only two or three times out of a dozen or two builds this year, usually when I’m trying to keep the cost down for a customer who has little $.
Next time I do one I’ll take some photos. As far as new built wheels, they’re not inexpensive, and vintage looking sets are hard to find. Used wheel or rim purchases are a real gamble but may be necessary.
Best,
John “wheelson”
|
|