|
|
Post by brianbutler on Feb 15, 2021 20:29:26 GMT
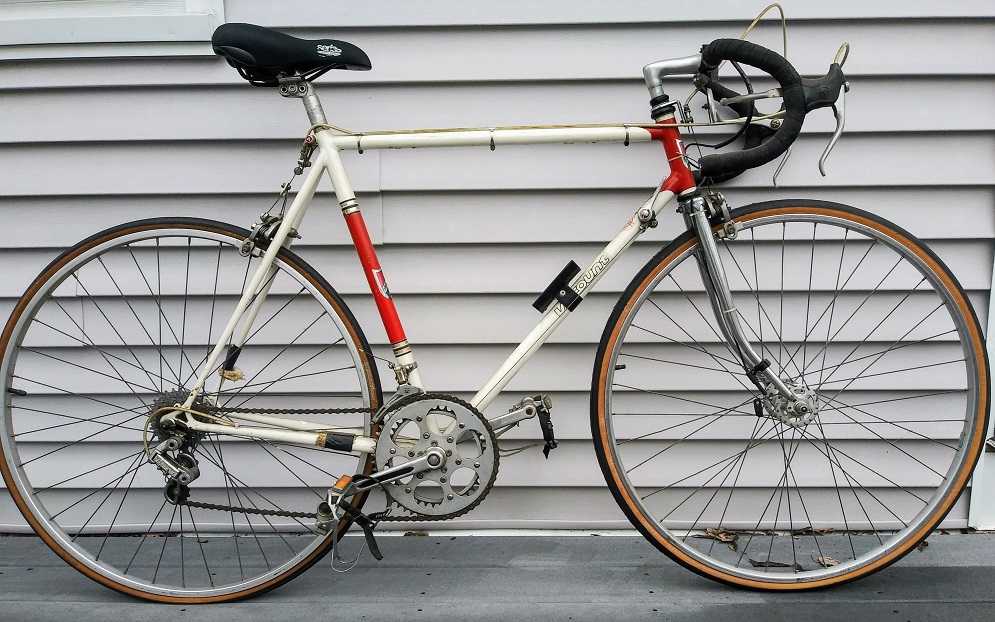
Yesterday I picked up this Viscount, serial number 009707, from a Facebook listing nearby - $80. Based on the Titlist RD, I believe it is an Aerospace Grand Prix but the decal is missing. It is in decent shape but there are some replacement parts - FD, complete rear wheel, saddle, chrome fork and ugly black headset. Pedal caps are missing of course. Not sure yet how I will redo this one but it will be all vintage and close to original.
Here are some additional "as found" pictures:
|
|
Jem
Viscount
 ?
?
Posts: 3,389 
|
Post by Jem on Feb 15, 2021 21:11:44 GMT
That looks like a fair price.How far did you have to go to collect Brian? I love the high flange.
I'm not looking at a reference pic, but my first thought is that the inner/smaller ring on front looks bigger than the one it is normally seen with? But I could be totally wrong on that.
EDIT- Just looked at a few pics- I take back my last observation
|
|
|
|
Post by brianbutler on Feb 15, 2021 21:53:03 GMT
That looks like a fair price.How far did you have to go to collect Brian? I love the high flange. I'm not looking at a reference pic, but my first thought is that the inner/smaller ring on front looks bigger than the one it is normally seen with? But I could be totally wrong on that. EDIT- Just looked at a few pics- I take back my last observation It was 20 miles away. Brian
|
|
|
|
Post by franco on Feb 15, 2021 22:18:48 GMT
Looks nice Brian, good price too.
I thought I had some original factory decals you could have had but I just checked and unfortunately they’re “Gran Touring” ones.
|
|
ks1u
Viscount
Posts: 76
|
Post by ks1u on Feb 15, 2021 22:46:04 GMT
Nice looking bike and great price. I'll bet you have some plans for it.
|
|
|
|
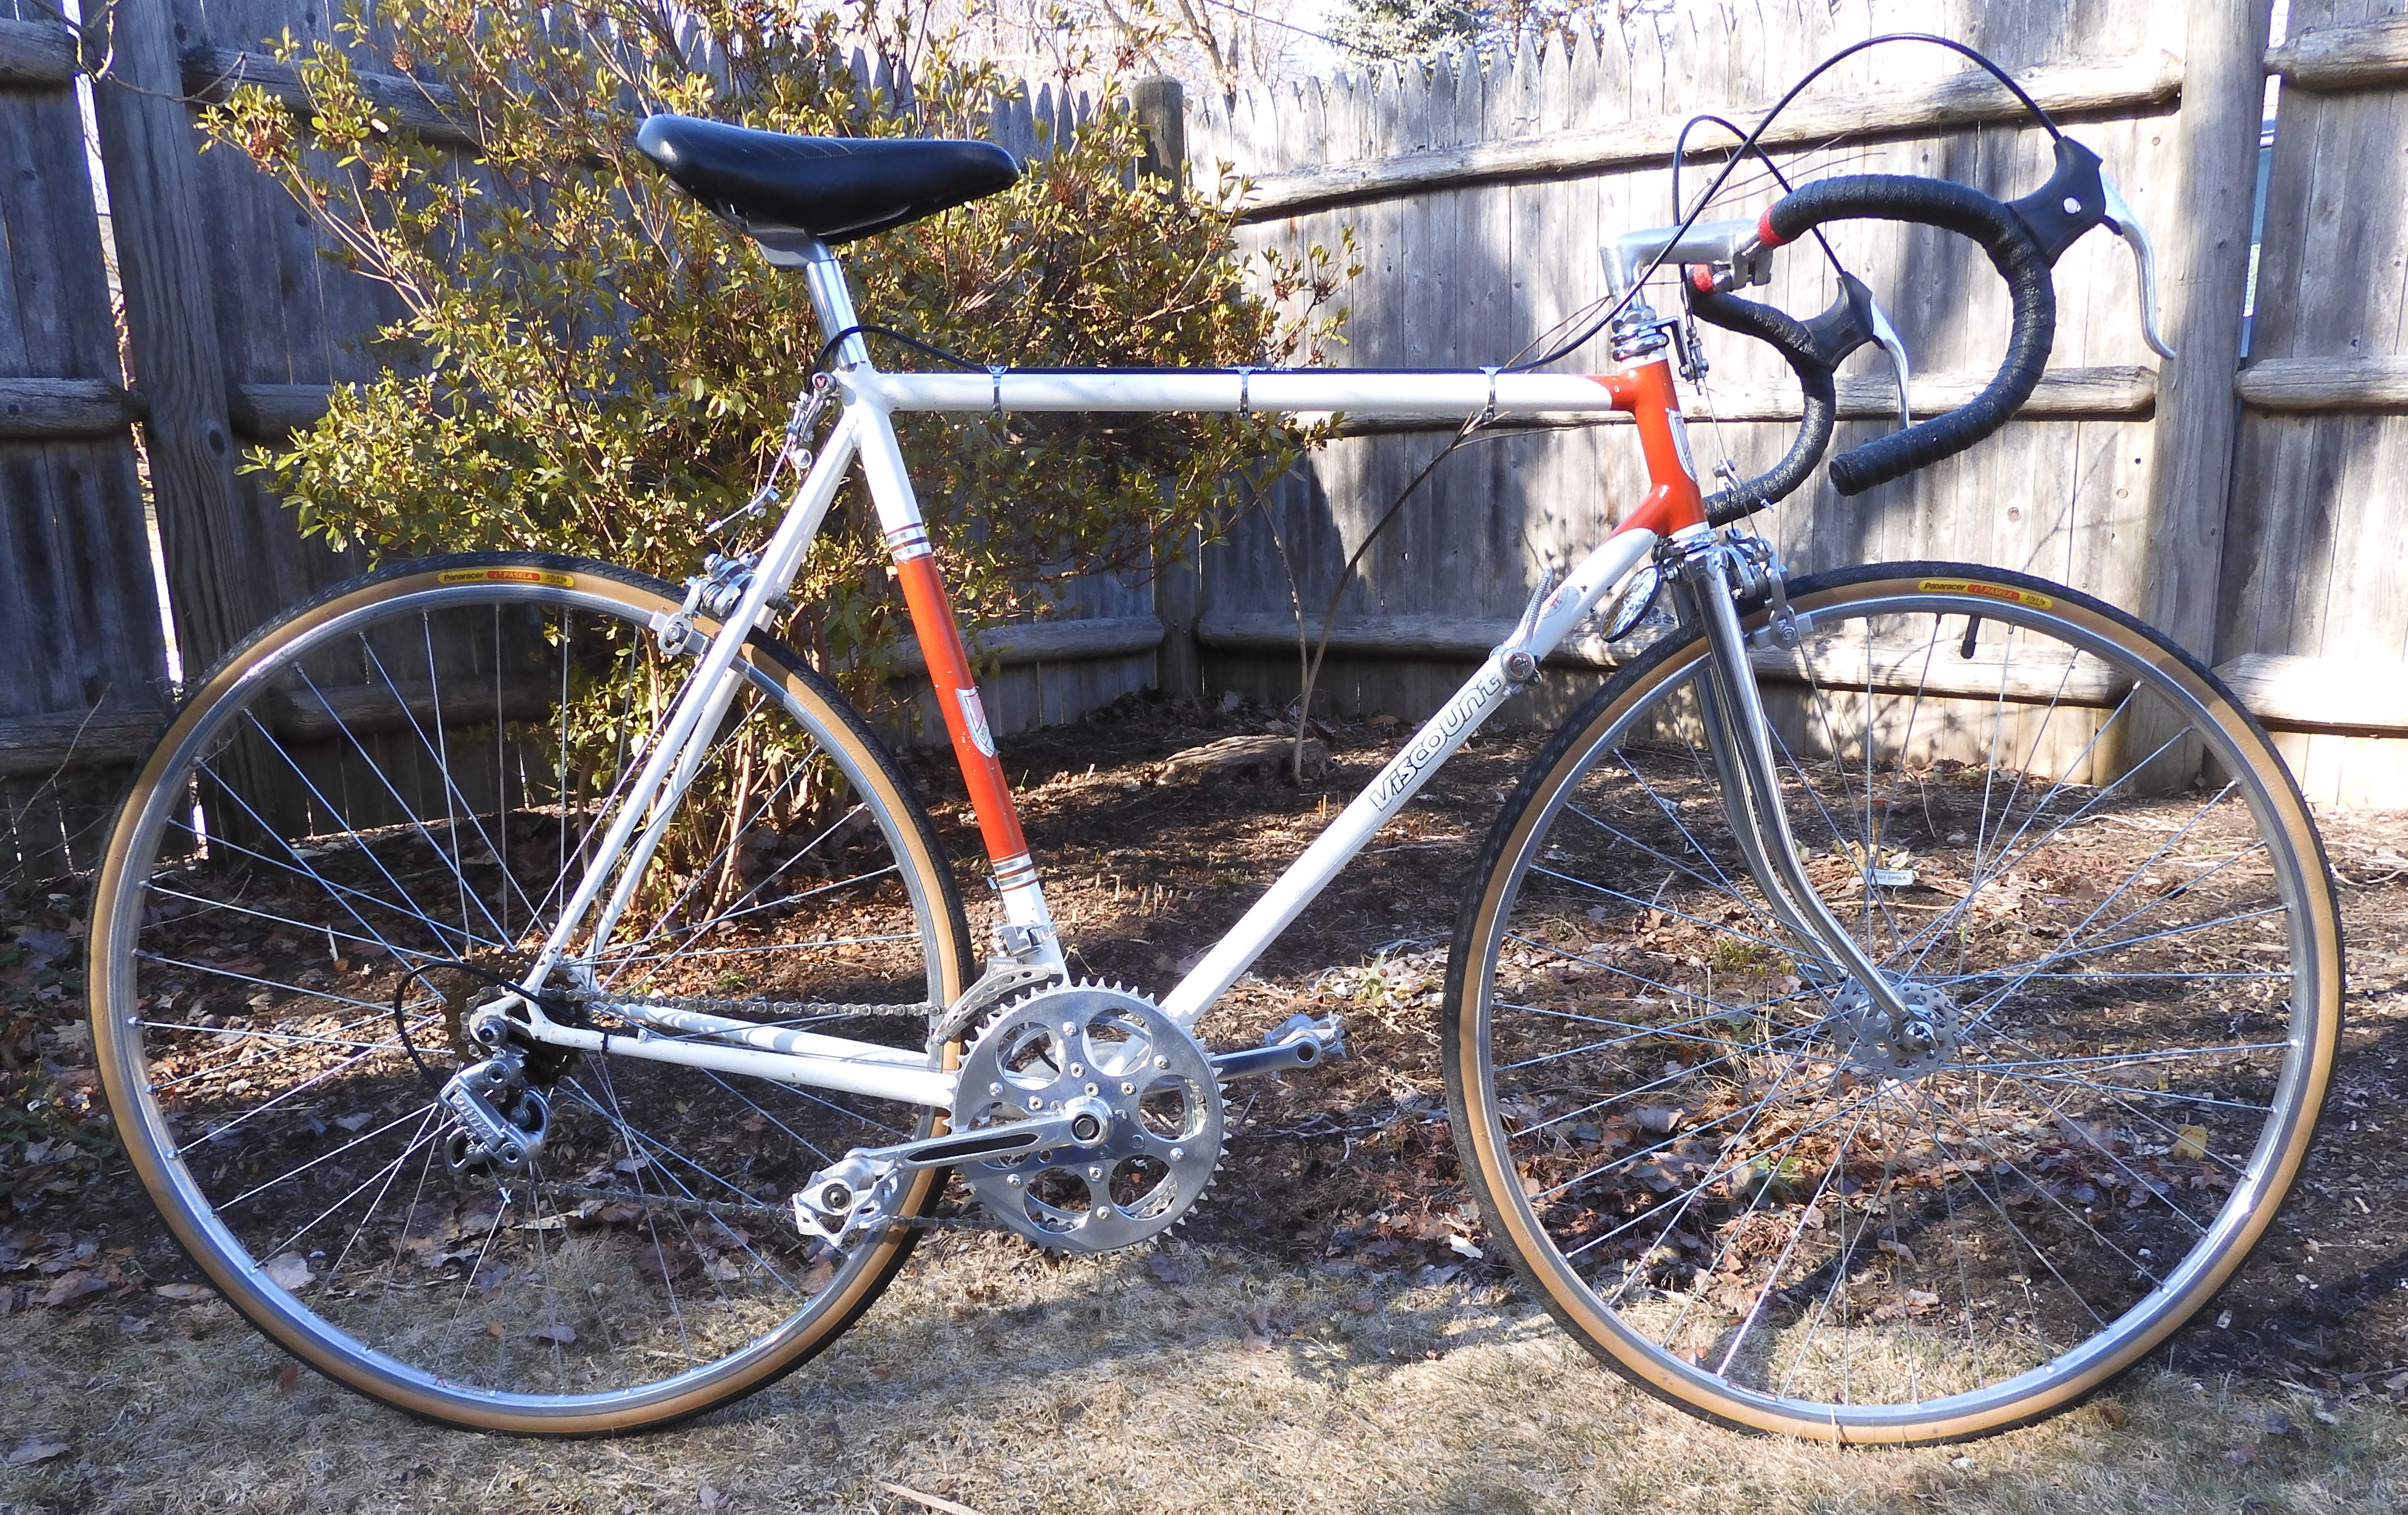
Post by brianbutler on Mar 18, 2021 0:42:44 GMT
Just finished reconditioning the recently acquired "Sharon" Viscount GP, so named because I bought it from someone in Sharon, MA. I returned it to pretty much original parts and pressed new bearings throughout, also rebuilt the needle bearings in the pedals. Should be an enjoyable ride as part of this year's stable.
Brian
|
|
rodh
Viscount
Posts: 121
|
Post by rodh on Mar 18, 2021 1:14:17 GMT
Nice result Brian. Do you take commissions? (jk!)
More seriously, do you have a special bearing extractor or assembly tool?
I've only ever replaced worn bearings, so I bash them out, and reinstall with a vise, but I worry about how well the finished pair are aligned, and I'm about to do some hubs in wheels, so the vise isn't an option.
Thanks,
Rod
|
|
|
|
Post by brianbutler on Mar 18, 2021 1:44:54 GMT
Nice result Brian. Do you take commissions? (jk!) More seriously, do you have a special bearing extractor or assembly tool? I've only ever replaced worn bearings, so I bash them out, and reinstall with a vise, but I worry about hiw well the finished pair are aligned, anc I'm sbout to do some hubs in wheels, so the vise isn't an option. Thanks, Rod Thanks for asking because I really need to give some credit here. Jim (oldroadie) had some pictures up showing how he installed the BB bearings with a low-cost bench arbor press. I went out and bought the same thing for about $50 and used it for the BB and both wheels. After pressing I did have to knock the ends of the spindle a few times to relieve some loading introduced during pressing.
I also owe thanks to John (wheelson) for the brilliant idea of salvaging spindles from modern sealed BBs (another job for the arbor press by the way). I used his idea, aka the Wheelson Hack, on this bike with excellent results.
If your vise opens wide enough, it is probably as good or better than the arbor press. Mine doesn't. Check into the subject of bearing "drifts", which are intended to press the inner and outer sides of the bearings at the same time. Here is a link on US eBay showing what I am talking about.
Brian
|
|
|
|
Post by wheelson on Mar 18, 2021 2:47:55 GMT
Thanks for the Wheelson Hack credit, Brian. I've been keeping my eyes open at the shop for discarded sealed bearing units that might have the useable spindle. In these times of parts shortages, it also occurred to me that it's usually the bearings that go bad in these sealed units. Since sealed bearings are usually available, I suppose nothing would stop a person from rebuilding the modern sealed units for the price of a bearing set. Who knows, perhaps back to the "good old days" when bike mechanics fixed things rather than just discarding and replacing! Seriously, that's one of the things that make this list so much fun, people who like to tinker and sometimes step outside the box.
Best,
John "wheelson"
|
|
|
|
Post by franco on Mar 18, 2021 7:39:30 GMT
Looks great Brian, should be good for many years now with new bearings throughout.
Good job on the handlebar tape as usual and the polished up chainset makes me want to do mine. Did you buff it up on the wheel? I usually go the elbow grease route but results are never as good as what you have achieved there.
|
|
|
|
Post by franco on Mar 18, 2021 7:55:05 GMT
I’d like to see some pictures of the BB installation at some point if anyone does another one, I still can’t fathom how I would do one with limited tools. Found this interesting picture on a press fit BB that was for sale on eBay as a possible Viscount/Lambert replacement  A57AE1B5-73BD-467F-BA4C-62E2CCB08AED A57AE1B5-73BD-467F-BA4C-62E2CCB08AED by Franco_AC, on Flickr |
|
|
|
Post by brianbutler on Mar 18, 2021 11:16:23 GMT
For the chainset, I scraped off as much crud as possible, then removed the remaining dried grease with WD-40 on a rag followed by a soapy water scrub with a Scotchbrite sponge. Next, I submerged it overnight in Evaporust to clear any rust. Finally, it was hand polished with mag-aluminum wheel polish and a rag, buffed with a microfiber cloth.
Jim, if you are following this thread, would you mind directing us to your shop photos where you press the BB? They are the definitive illustration.
Brian
|
|
rodh
Viscount
Posts: 121
|
Post by rodh on Mar 18, 2021 12:25:33 GMT
If your vise opens wide enough, it is probably as good or better than the arbor press. Mine doesn't. Check into the subject of bearing "drifts", which are intended to press the inner and outer sides of the bearings at the same time. Here is a link on US eBay showing what I am talking about.
Brian
Thanks for the URL Brian. I use a steel washer backed by a parallel faced collar (lathe parted tubing) ... but the idea's the same. Mine's a bit of a fiddle, and isn't nicely anodised red, but at least it's not soft aluminium! 👍 I'd like a bearing press, but I find it hard to justify the spend on tools I'll only ever use once, ... and even harder to get stuff accepted as standard kitchen equipment that everyone should have 😉 On the issue of polished allloy parts, how do you protect them once the anodising has been removed? Does this become a lifetime labour of re-polishing, mitigated by oiling or waxing or something? Rod |
|
|
|
Post by brianbutler on Mar 18, 2021 15:40:06 GMT
I don't do anything that removes anodizing. The mag/aluminum polish turns black in use if the surface is raw aluminum (well actually a molecule or so thickness of aluminum oxide over raw aluminum). These parts come up to a brilliant shine and stay good for quite a while (several years at least). Anodized parts are not affected by the polish or the soft Scotchbrite pads. It is not possible to bring these up to brilliant so they basically just get cleaned. Most of the vintage parts like derailleurs, brake calipers, brake levers, hubs, stems, seatposts, handlebars, and many chainsets are not anodized and can be polished to a mirror finish.
Brian
|
|
|
|
Post by brianbutler on Mar 18, 2021 15:42:38 GMT
I don't do anything that removes anodizing. The mag/aluminum polish turns black in use if the surface is raw aluminum (well actually a molecule or so thickness of aluminum oxide over raw aluminum). These parts come up to a brilliant shine and stay good for quite a while (several years at least). Anodized parts are not affected by the polish or the soft Scotchbrite pads. It is not possible to bring these up to brilliant so they basically just get cleaned. Most of the vintage parts like derailleurs, brake calipers, brake levers, hubs, stems, seatposts, handlebars, and many chainsets are not anodized and can be polished to a mirror finish.
Brian
|
|
rodh
Viscount
Posts: 121
|
Post by rodh on May 2, 2021 1:36:44 GMT
A follow-up question as I saw you re-built your pedals: how much vertical play did you end up with?
I have a pair which I've not fitted, but I'm tempted to give them a try. Obviously the end play can be fine tuned with shims, but vertical play made me think they needed new bearings. I stalled on proper examination when I found the end screw wouldn't budge ... but now I'm tempted to try harder.
I might be motivated to make new dust caps too, unless someone has some spare "V"s (or pedals???)
Best,
Rod
|
|
|
|
Post by brianbutler on May 2, 2021 12:44:46 GMT
A follow-up question as I saw you re-built your pedals: how much vertical play did you end up with? I have a pair which I've not fitted, but I'm tempted to give them a try. Obviously the end play can be fine tuned with shims, but vertical play made me think they needed new bearings. I stalled on proper examination when I found the end screw wouldn't budge ... but now I'm tempted to try harder. I might be motivated to make new dust caps too, unless someone has some spare "V"s (or pedals???) Best, Rod Vertical play was essentially zero after servicing. I have done several sets of these pedals and none had much wear on the needle bearings or races, which appear to be brass. On some, the needles were encrusted and it was a challenge to get the first one out. After that they are easy to get out with a sharp pick. There are 24 needles in each bearing. The end screw can be tight - WD40 and the right size screwdriver help. Good luck.
Brian |
|
rodh
Viscount
Posts: 121
|
Post by rodh on May 2, 2021 14:06:24 GMT
Thanks Brian - good to know the bearing case is brass, although a bit of a surprise as I thought they'd be case hardened steel like the needles, or hardened-through steel like the spindles.
Perhaps that's the part that's worn then. I guess careless use without dust caps allows a perfect grinding paste to get to work and steadily destroys an otherwise clever design.
Next job will be to get them apart ... the fastener appears to be a 3mm panhead socket screw but I've already rounded my Allen key, so I need to get out my grinder and shorten that for a fresh start.
I've tried pre-soaking in white spirit, a tap with a punch to loosen corrosion, and heating to 100c to help loosen them, but no joy so far; currently they're immersed in paraffin ... I'll let you know how I get on.
Best,
Rod
|
|
|
|
Post by brianbutler on May 2, 2021 18:55:41 GMT
Now that I hear someone else say it, brass sounds wrong. It could be steel stained with old grease, which would make more sense. Or maybe just the notoriously poor lighting in my work area. I forgot about the hex cap. I used a small socket wrench with a hardened hex key socket. It took a bit of force but eventually clicked free. Good that you rounded the key instead of the hex cap.
One other thing to keep track of - the little pin that aligns with the hole in the outside cap is not permanently attached, just pushed in. It looks like a bearing needle cut in half. Be careful not to lose it.
Brian
|
|
rodh
Viscount
Posts: 121
|
Post by rodh on May 2, 2021 19:07:48 GMT
Thanks Brian ... I'll let you know what I find when I get in there!
PS, I think I know why I rounded my Allen key ... the screw's Imperial! (1/8" is 3.175 mm ... i.e. metric 3mm is undersized)
PPS, Ignore that, I just checked the dealer manual and it shoukd be a 3mm Allen ... sigh ...
|
|