|
|
Post by franco on Oct 21, 2020 16:18:43 GMT
Rather than start a new thread on every repair I thought this might be a good idea?
I’ve got two tasks on at the moment and the first one is proving to be a real pain.
Bought a new compact chainset for the Aerospace 400, of course, it’s way out of line on the existing square taper axle, so I’ve bought a sealed bottom bracket recommended by the supplier.
The existing fixed cup will not move despite a load of penetrating fluid, looked at another which meant buying more tools and making up a threaded bar to hold the wrench tightly in place. Then I come across this inexpensive hack which I will try later this week
The other task (that I’ve not done before) is to shorten the threaded steerer on some chrome forks to replace the damaged ones on the Colorado. I could buy the hacksaw guide that Park Tool and others make, but read suggestions on using a spare locknut as a guide, it also cleans the threads up afterwards apparently.
Anyone tried this or another method?
I try to do things on a budget if I can especially regarding buying a tool I’ll probably never use again.
|
|
|
|
Post by wheelson on Oct 21, 2020 16:53:06 GMT
On task 1, absolutely! This method works when all others fail. I've used it many, many times over the years.
On task 2, the lock ring, lock nut that will thread through, or an old top cone will work great and as you say, will clean the threads when you remove it.
I like that you're using lower budget fixes and tools. There's a lot of non-bike tools that can be repurposed as well.
Best,
John "wheelson"
|
|
|
|
Post by franco on Oct 21, 2020 17:23:37 GMT
Thanks John, good to get some advice from the more experienced guys here  Partly due to budget (you could spend thousands at this game couldn’t you) I like exploring old trusted methods or finding new inexpensive hacks. |
|
|
|
Post by lighthousejim on Oct 21, 2020 20:12:50 GMT
In the video, I couldn't help wincing when he put a 'cheater bar' on the adjustable spanner. I've done it with sockets but I had visions of the jaws exploding and shattered knuckles. If you need more leverage in a situation like that, make sure you use a well fitting spanner.
Jim
|
|
|
|
Post by brianbutler on Oct 21, 2020 21:41:41 GMT
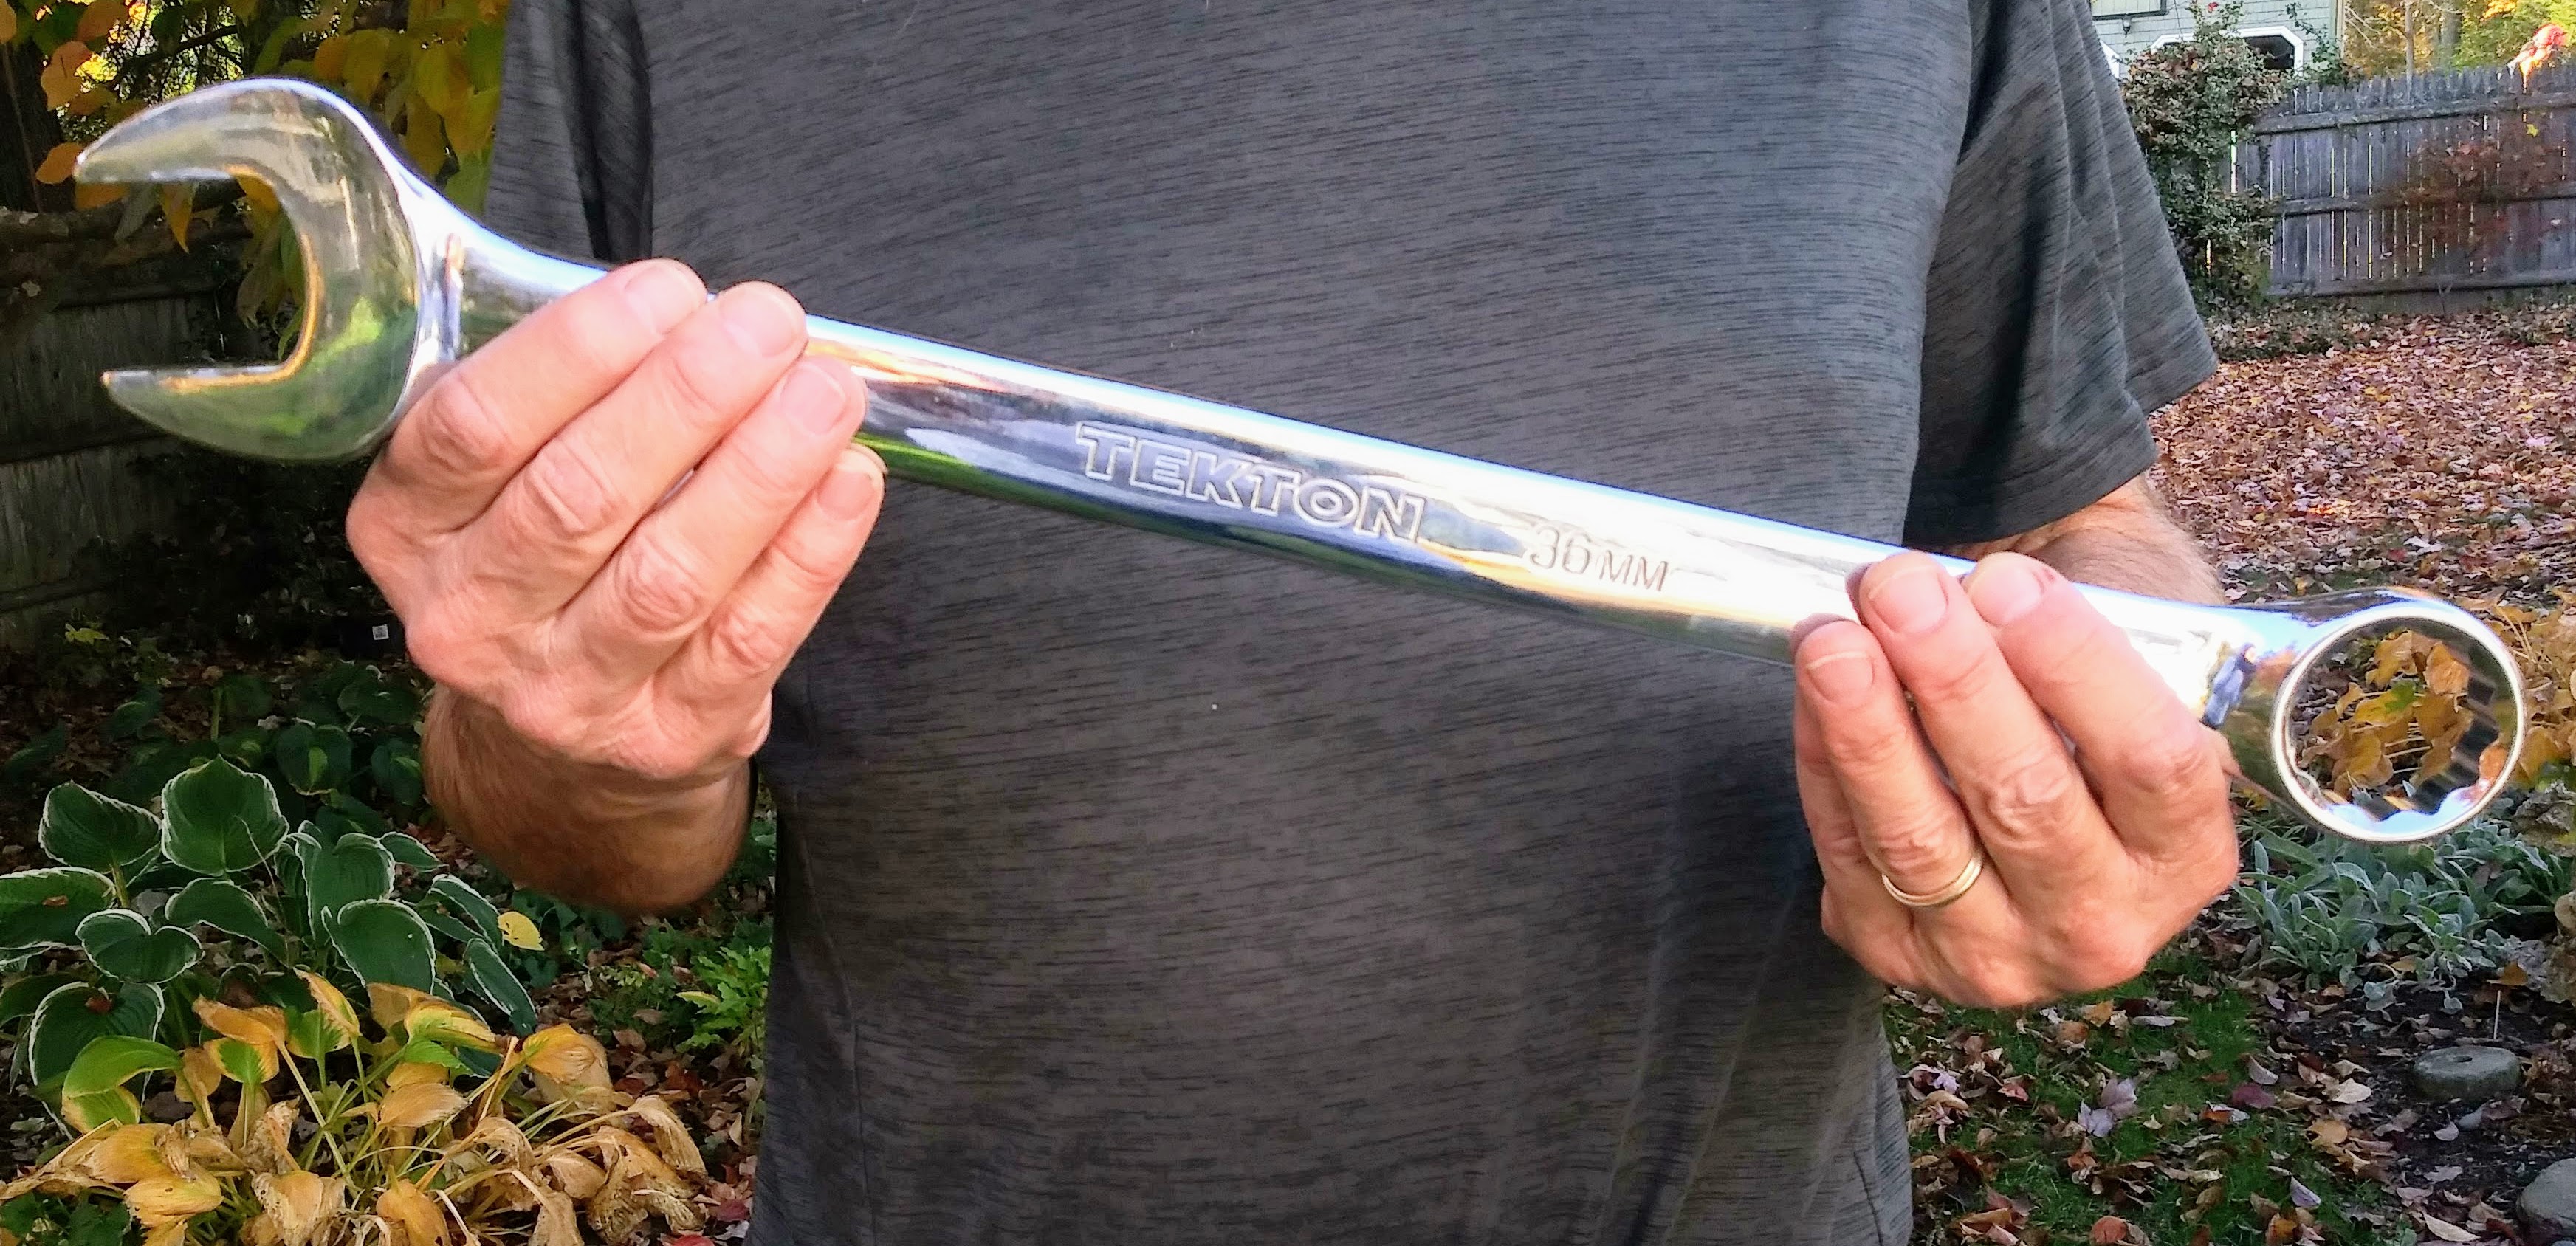
Task 1: Unlike Wheelson, I have tried that method of removing fixed cups without success. Generally what happened was the lock washers deformed and got stuck in the cup. With harder washers, The nut galled the bolt, which was then stuck and had to be cut off from the outside. The method I have found that works best is to bite the bullet and buy the right size (35mm or 36mm) tool steel wrench (spanner). Clamp it with washers and threaded rod to keep it from slipping off the flats. This gives you about 18 inches of leverage applied to the outside rim of the cup where it has the most mechanical advantage. The other BIG thing is to make sure you are turning it in the correct direction. It is usually left threaded, so unscrew it to the right. I have taken apart quite a few French bikes that are right threaded, but not all of them are. The long wrench is so effective that I can tell right away if I am tightening instead of loosening because the cup will often actually tighten further. If you try this, measure carefully and get the correct size wrench.
Task 2: The pair of lock rings works. I used a pair of old headset adjustable cups mounted with the curved surfaces facing into the cut. This prevented the hacksaw from hanging up on the edge of the nut. I posted a picture near the bottom of this thread:
Brian
|
|
ks1u
Viscount

Posts: 76 
|
Post by ks1u on Oct 21, 2020 23:39:50 GMT
Before I go with long cheater bars, after the penetrating oil I use a modest amount of heat from a heat gun, and then let it cool for about 30 seconds and then apply the force. You have to be careful not to touch the heated part and to keep the heat away from tires and painted surfaces.
|
|
|
|
Post by wheelson on Oct 22, 2020 2:19:14 GMT
You're right heat works pretty well, for a stuck seat post as well. It doesn't have to be a lot sometimes, even that from a hair dryer. As far as the cheater bar, that for me is a last resort. I like to put the correct wrench for the cup in the stack with the bolt and lock washers, backing the wrench on the outside with a large washer. With the bolt sufficiently snug to keep the wrench from slipping off, many times a few whacks with a mallet will break the stubborn cup loose.
Best,
John "wheelson"
|
|
|
|
Post by franco on Oct 23, 2020 15:49:11 GMT
Penetrating oil, heat gun, bolt with washers and nut... this thing ain’t moving!
It’s just chewing bolts up.
This BB had more corrosion than usual so I’m guessing the fixed cup is really seized in, it’s the first one I haven’t managed to get out in dozens of bikes.
Saving grace is there isn’t actually anything wrong with the existing crankset, it was just an upgrade. Looks like another bike is going to get the upgrade instead.
|
|
|
|
Post by brianbutler on Oct 23, 2020 19:43:21 GMT
Sounds like my experience with that technique. Franco, I think it is time for the persuader.
|
|
|
|
Post by franco on Oct 23, 2020 19:52:35 GMT
Haha, that looks a beast! |
|
|
|
Post by brianbutler on Oct 23, 2020 20:53:43 GMT
Just used it last night to take the cup off Wheelson's Lambert. Hasn't failed me yet. I secure it to the flats with big washers and a threaded rod.
|
|
|
|
Post by franco on Oct 23, 2020 22:15:04 GMT
How much did it cost out of interest?
I’ve got £40 in this conversion already on a £50 bike and I’m reluctant to carry on spending. It’s a nice bike but no Bobby Dazzler. Having said that I don’t like being defeated.
|
|
|
|
Post by brianbutler on Oct 24, 2020 1:55:28 GMT
How much did it cost out of interest? I’ve got £40 in this conversion already on a £50 bike and I’m reluctant to carry on spending. It’s a nice bike but no Bobby Dazzler. Having said that I don’t like being defeated. After spending about a week trying all sorts of ways to get the cup off an old French bike, I broke down and reluctantly paid about $30 for a 35mm wrench. It worked like magic and I used it on many other bikes. Then I ran into a Japanese bike discovered it had 36mm flats. This time it was easier to part with the money but more expensive - about $40. For some reason the size and heft of these wrenches increases a lot between the 35mm and 36mm sizes. I have used both of them on many bikes. I don't even try any other method at this point so those tools have turned out to be good investments. If I were nearby I'd lend it to you.
Brian
|
|
|
|
Post by wheelson on Oct 24, 2020 3:37:35 GMT
Sounds like you're using a combination of the bolt and washer with a hefty wrench. That's more or less what I usually do, a heavy duty bolt and various washers to sandwich the wrench on the cup flats and to insure it won't slip off. Usually works great without a cheater bar, just a few good whacks with a mallet. I don't recall ever being defeated, but at 72 there's quite a bit I don't recall!
Schwinn had a wrench for headsets that was essentially a large open/box combination with a section cut out of the boxed end just enough to slide over the stem, yet still function as a boxed end wrench. Very effective and cost a small fortune if you can find one these days. I don't own one but I currently don't have the need for one anyway.
Best,
John "wheelson"
|
|
|
|
Post by brianbutler on Oct 24, 2020 12:26:46 GMT
Sounds like you're using a combination of the bolt and washer with a hefty wrench. That's more or less what I usually do, a heavy duty bolt and various washers to sandwich the wrench on the cup flats and to insure it won't slip off. Usually works great without a cheater bar, just a few good whacks with a mallet. I don't recall ever being defeated, but at 72 there's quite a bit I don't recall! Schwinn had a wrench for headsets that was essentially a large open/box combination with a section cut out of the boxed end just enough to slide over the stem, yet still function as a boxed end wrench. Very effective and cost a small fortune if you can find one these days. I don't own one but I currently don't have the need for one anyway. Best, John "wheelson" John I think we are talking about the same thing. I put a washer over the left side of the BB shell, put a bolt through it and the right side cup. Then the wrench is set on the flats and a washer and nut put on the outside of the wrench. These simply keep the wrench in place and should not be too tight so the cup can start moving without friction on either washer.
What I am NOT doing is what RJ the Bike Guy (and Sheldon Brown maybe) suggests, which is to put a bolt into the right side cup and add lock washers and a nut inside the right cup, then hope the washers jam in a way that provides enough friction to free the cup when you tighten the bolt. I found this approach has many problems.
1. The washers may jam in a way that causes them to stick in the cup. 2. The bolt may be overtightened and deform the nut or bolt threads, jamming them together, making it necessary to cut off the bolt to remove it. 3. The friction between the washers and cup might not be sufficient (especially if any grease remins) and the bolt assembly turns without turning the cup. 4. The washers/nut may damage the bearing race, especially if you use Grade 8 hardware in an effort to avoid problems 1-3. 5. The technique cannot work on right threaded (i.e. older French) fixed cups for obvious reasons.
Another thing I have been meaning to try is soaking the BB shell and fixed cup in EvapoRust for a couple of days prior to removal. I love that stuff. Sometimes I soak a corroded assembly overnight and a seemingly stuck bolt will come out just finger tight. The solution gets into the threads and chemically dissolves the rust, which seems more effective than just lubricating.
Brian
Brian
|
|
|
|
Post by franco on Oct 24, 2020 13:09:55 GMT
Thought I’d give it one last go today and back to my original way, adjustable wrench, a hammer and plenty of heat gun. I got the swine out!  It wasn’t as badly corroded as I thought but either the grease had congealed or something like plumbers cement was used when it was put in. The new crankset is on and working well in the stand, not been out for a ride as the weather is awful today. The Sakae crankset I’ll probably use on the Colorado now instead of the cottered crankset. |
|
|
|
Post by oldroadietehachapi on Oct 24, 2020 13:37:59 GMT
It does not slip, so it keeps you from chipping the paint. It works great, but expensive if only needed once.
|
|
|
|
Post by brianbutler on Oct 24, 2020 15:56:16 GMT
Jim, is that 35mm on one side and 36mm on the other?
Brian
|
|
|
|
Post by franco on Oct 24, 2020 18:30:41 GMT
Sounds like you're using a combination of the bolt and washer with a hefty wrench. That's more or less what I usually do, a heavy duty bolt and various washers to sandwich the wrench on the cup flats and to insure it won't slip off. Usually works great without a cheater bar, just a few good whacks with a mallet. I don't recall ever being defeated, but at 72 there's quite a bit I don't recall! Schwinn had a wrench for headsets that was essentially a large open/box combination with a section cut out of the boxed end just enough to slide over the stem, yet still function as a boxed end wrench. Very effective and cost a small fortune if you can find one these days. I don't own one but I currently don't have the need for one anyway. Best, John "wheelson" John I think we are talking about the same thing. I put a washer over the left side of the BB shell, put a bolt through it and the right side cup. Then the wrench is set on the flats and a washer and nut put on the outside of the wrench. These simply keep the wrench in place and should not be too tight so the cup can start moving without friction on either washer.
What I am NOT doing is what RJ the Bike Guy (and Sheldon Brown maybe) suggests, which is to put a bolt into the right side cup and add lock washers and a nut inside the right cup, then hope the washers jam in a way that provides enough friction to free the cup when you tighten the bolt. I found this approach has many problems.
1. The washers may jam in a way that causes them to stick in the cup. 2. The bolt may be overtightened and deform the nut or bolt threads, jamming them together, making it necessary to cut off the bolt to remove it. 3. The friction between the washers and cup might not be sufficient (especially if any grease remins) and the bolt assembly turns without turning the cup. 4. The washers/nut may damage the bearing race, especially if you use Grade 8 hardware in an effort to avoid problems 1-3. 5. The technique cannot work on right threaded (i.e. older French) fixed cups for obvious reasons.
Another thing I have been meaning to try is soaking the BB shell and fixed cup in EvapoRust for a couple of days prior to removal. I love that stuff. Sometimes I soak a corroded assembly overnight and a seemingly stuck bolt will come out just finger tight. The solution gets into the threads and chemically dissolves the rust, which seems more effective than just lubricating.
Brian
Brian
I’m glad you mentioned evaporust. Looking at the Colorado forks today and I think I can straighten the bend it’s so minor, problem is getting the cut off seized handlebar stem out. Spent ages today cutting down the length of the stem to see if I could crush it inwards, most of it is out, so I’ve put the forks upside down in the evaporust tonight to see if that loosens the last bit. |
|
|
|
Post by franco on Nov 7, 2020 19:22:49 GMT
A few updates from the shed...
I took the 400 out today, new BB, new compact chainset and new rear block. It’s transformed the performance of the bike, really smooth to ride.
No joy with the Colorado forks so it looks like I’ll have to find a replacement.
Yet to dismantle the unbranded freewheel that seized up.
|
|
|
|
Post by franco on Nov 20, 2020 14:57:55 GMT
If anyone is looking for decals in a different colour to what is available on eBay, HLloyd Cycles will change the colour if they have the decal in stock. Ordered these to tidy up the Aerospace 400, they were red on the website and I asked them for black to match the existing seat tube decals.  D2186038-2FA5-4E54-B274-EE997C9E2AF9 D2186038-2FA5-4E54-B274-EE997C9E2AF9 by Franco_AC, on Flickr |
|
|
|
Post by dracco on Nov 20, 2020 18:59:38 GMT
Oooh brilliant! They've now got the VISCOUNT in caps and the winged cyclist head tube decal!
|
|
|
|
Post by oldroadietehachapi on Nov 21, 2020 5:41:56 GMT
Jim, is that 35mm on one side and 36mm on the other? Brian Yes it is |
|