|
|
Post by oldroadietehachapi on Feb 13, 2021 21:41:23 GMT
I admit I like the idea of one mirror per helmet instead of one per bike. One per head would be better but I rotate through several helmets, leaving a couple to sanitize in the sun while I wear one for a week. Brian I bet I could stitch one to your head; people might stare and Mrs. B may not like it :-) I do have one for each helmet.
Jim
|
|
|
|
Post by brianbutler on Feb 14, 2021 2:20:09 GMT
I admit I like the idea of one mirror per helmet instead of one per bike. One per head would be better but I rotate through several helmets, leaving a couple to sanitize in the sun while I wear one for a week. Brian I bet I could stitch one to your head; people might stare and Mrs. B may not like it :-) I do have one for each helmet.
Jim
I haven't had a haircut in over a year so I doubt that you could find my head. Brian
|
|
|
|
Post by brianbutler on Mar 20, 2023 12:27:32 GMT
John, if you use 5mm rivnuts, use a 1/4" drill, not 17/64 like RJ the Bike Guy says on his video about using them for bottle cage bosses. I found out the hard way that the rivnut will spin in the 17/64 hole and you will have to resort to the arrangement I described in my previous post. I think the 1/4" hole would grab the splines on the rivnut shank tight enough to get it started. Why I actually had a 17/64" drill bit is anybody's guess and I wish I didn't. I like Suntour components generally but they often have steel parts threaded into aluminum. It's a fine line between tight enough and too tight, especially with older components that have been adjusted many times. Brian I noticed Viktor "liked" this post so it is a good opportunity to update it with a recent idea. Put a small drop of red loctite, or even JB Weld, on the flange of the rivnut before inserting and let it dry before trying to tighten. This would hold the rivnut and let the screw compress it more effectively without spinning.
Brian
|
|
|
|
Post by brianbutler on May 10, 2023 18:33:05 GMT
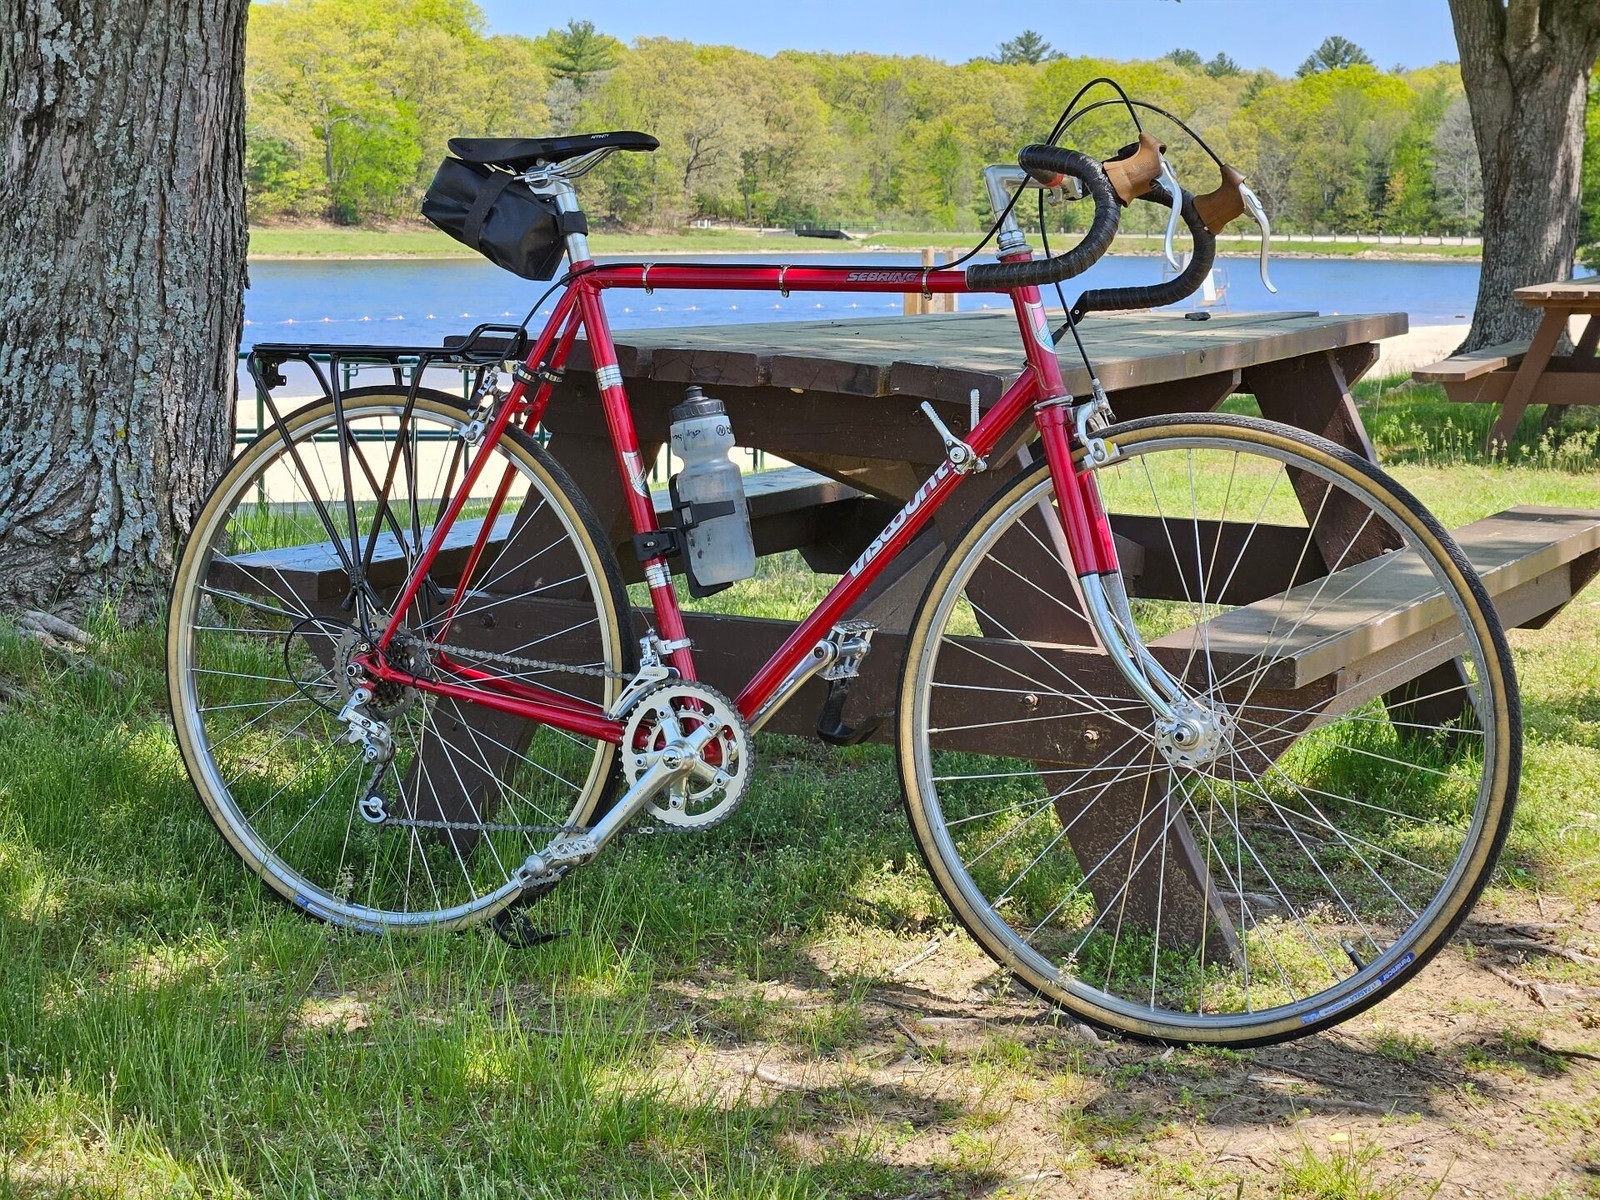
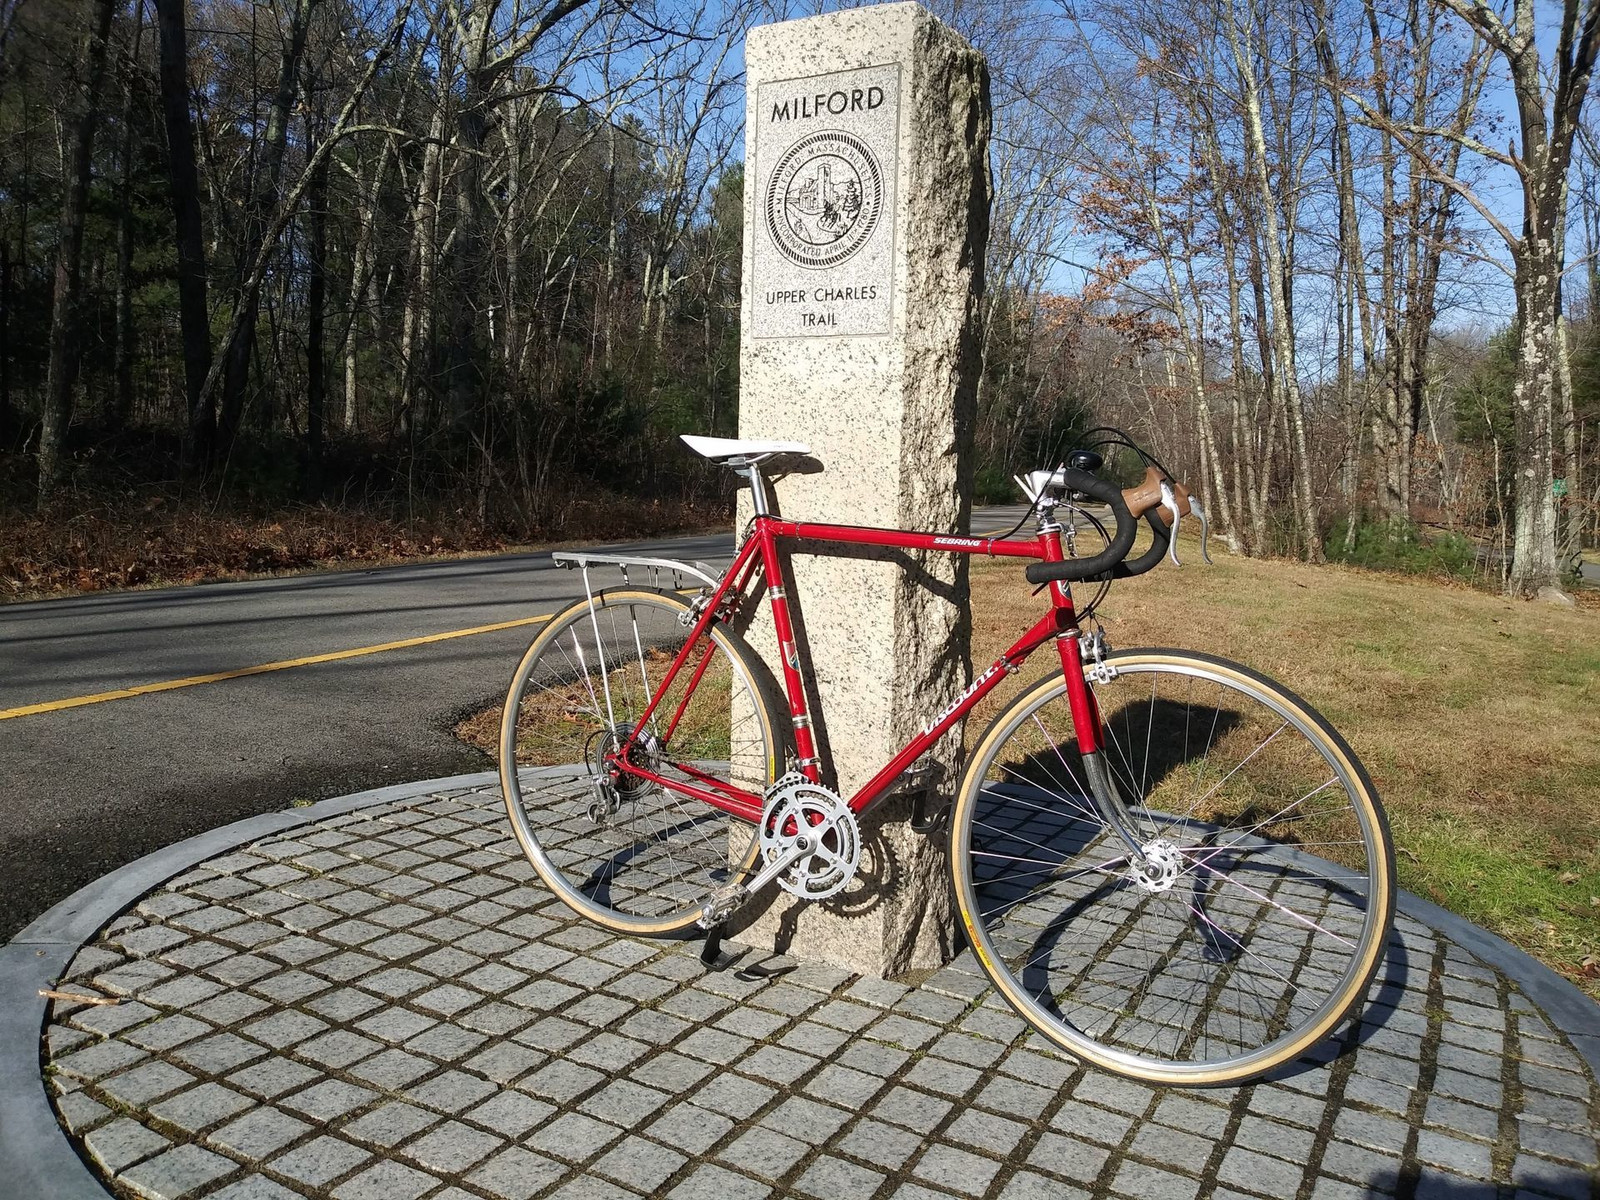
With the Trek 520 sold, the Viscount Sebring has become my "touring bike." Took it out today for a 34 mile spin to test the recent overhaul. I'll say it again - this is the most comfortable riding bike in my collection.
|
|
|
|
Post by jazzkifli on May 12, 2023 7:25:26 GMT
Finally had a day when the bike was clean and the sun was shining. Here is my 1975 Viscount Sebring that I have been using daily this month. It has the original Shimano 600 derailleurs and shifters, and Shimano Tourney brakes. Almost everything else has been upgraded to make it a reasonably good ride - wheels from a French bike (I forget what), MKS Sylvan pedals, alloy seatpost and a Bontrager saddle. I took it completely apart and refurbished it about a year ago and have ridden it about 800 miles since.
Hi Brian, Can you please help me out, what kind of bicycle trunk do you used on this photo? I like it very much, I search a similar design for me too. Many thanks in advance  Viktor |
|
|
|
Post by jazzkifli on May 12, 2023 8:42:57 GMT
|
|
Jem
Viscount
 ?
?
Posts: 3,389 
|
Post by Jem on May 12, 2023 8:47:49 GMT
I have a couple of the Pletscher racks like that - very good. I probably have a spare one that you could have for free but I guess that the shipping would then make it more expensive than buying off ebay locally to you? They were made in Switzerland I think? Drop me a line if you can't find one Viktor (just pay postage)
Showa (Japanese made) are also very good and used on many Viscount such as the Deore 18AX.
|
|
|
|
Post by jazzkifli on May 12, 2023 9:02:06 GMT
I have a couple of the Pletscher racks like that - very good. I probably have a spare one that you could have for free but I guess that the shipping would then make it more expensive than buying off ebay locally to you? They were made in Switzerland I think? Drop me a line if you can't find one Viktor (just pay postage) Showa (Japanese made) are also very good and used on many Viscount such as the Deore 18AX. Oh wow Jim, your offer is very generous! Can you just calculate a shipping fee for me? I check the 2 other modell also, thanks you. KR Viktor |
|
Jem
Viscount
?
Posts: 3,389
|
Post by Jem on May 12, 2023 9:03:38 GMT
I'll check now Viktor. I will get back later today. No problem.
Do you need anything else ? I might have a few parts laying around in my shed that I am desperately trying to clear out
|
|
|
|
Post by Admin on May 12, 2023 9:12:16 GMT
Viktor, I edited out your address out , just incase any spammers can use it etc
Jem has your address for calculating shipping though, so he'll be in touch
|
|
|
|
Post by jazzkifli on May 12, 2023 9:20:35 GMT
Viktor, I edited out your address out , just incase any spammers can use it etc Jem has your address for calculating shipping though, so he'll be in touch Hi Admin, Ups, many thanks! KR Viktor |
|
|
|
Post by jazzkifli on May 12, 2023 9:30:06 GMT
I'll check now Viktor. I will get back later today. No problem. Do you need anything else ? I might have a few parts laying around in my shed that I am desperately trying to clear out Hi Jim, I just sent a PM to you. KR Viktor |
|
Jem
Viscount
?
Posts: 3,389
|
Post by Jem on May 12, 2023 9:38:07 GMT
Looks like it costs 12 euro..
|
|
|
|
Post by brianbutler on May 12, 2023 10:28:53 GMT
It looks like this question is resolved. I have many of those Pletscher racks. It seems they were added to at least half the bikes sold in the US during the 70's. The bracket on those racks is a problem. They do not hold well and they scratch the frame. Here is a thread from two years ago that describes a solution:
Brian
|
|
|
|
Post by jazzkifli on May 12, 2023 10:32:13 GMT
It looks like this question is resolved. I have many of those Pletscher racks. It seems they were added to at least half the bikes sold in the US during the 70's. The bracket on those racks is a problem. They do not hold well and they scratch the frame. Here is a thread from two years ago that describes a solution:
Brian
Hi Brian, Thank you, I will use a similar solution for my frame also KR Viktor |
|
|
|
Post by brianbutler on May 12, 2023 12:48:51 GMT
It looks like this question is resolved. I have many of those Pletscher racks. It seems they were added to at least half the bikes sold in the US during the 70's. The bracket on those racks is a problem. They do not hold well and they scratch the frame. Here is a thread from two years ago that describes a solution:
Brian
Hi Brian, Thank you, I will use a similar solution for my frame also KR Viktor It can be tricky to fit these racks with center-pull brakes. First, you have to disconnect the cable and route it through the rack. Then the rack must be mounted high on the seat stays to avoid interference with the straddle cable. However, the "legs" on the rack are fixed length, often making it impossible to level the rack. There are several possible solutions, but I haven't tried them:
1. Make an extension from flat stock that bolts onto the bottom of the leg. Problem - difficult to prevent flexing at the joint.
2. Replace the leg entirely. Problem - must determine length beforehand.
3. Cut the leg, thread both cut ends, and place an internally threaded tube between them for length adjustment. Problem - making or finding the threaded tube. The legs are about 7.5mm in diameter and made of aluminum. I am not aware of standard 7.5mm taps and dies, so it might be better to use SAE 3/16" . I wish someone with a decent machine shop would try this, and that is not me.
Brian
Brian
|
|
Jem
Viscount
?
Posts: 3,389
|
Post by Jem on May 12, 2023 13:10:07 GMT
I always found them difficult to level.
|
|
|
|
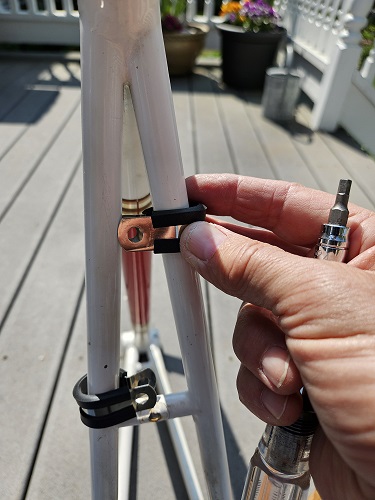
Post by brianbutler on May 18, 2023 17:08:25 GMT
I got to wondering "How would you install a Pletscher rack on an Aearospace frame with center pull brakes?" I have an urgent need to do just that for a long paved rail trail ride next week. I plan to use my single speed Aerospace GP. It is a 68 mile route, so I need to carry some extra stuff in a plastic box strapped to my rack. Here is how I installed the rack:
1. Move the center pull brake to the front side of the seat stays. This might require a longer cable, possibly by stealing some excess housing from the front of the bike. In my case, I had just enough cable to do the job.
2. Using a level, play around with the rack and legs until you have the correct position on the seat stays and mark it. You can see my marks in the photo. Mount the rack to the seat stays with rubber P-clamps. I used 13mm diameter clamps secured with M5 bolts, nuts, and lock washers. You might have to drill some new holes in the end of the rack. Mine is slightly off center because I used one factory hole and one extra hole that was drilled at some time. I did not have enough room to drill new holes for perfect symmetry.
3. Attack the legs of the rack to the holes in the dropouts. You can use a 4mm bolt and nut, but I tapped the hole to M5 x 0.8 and secured the rack with M5 screws. The hole was already the right size to tap.
4. Finished result. The brake cable routing is not ideal, but it works and does not interfere with anything. It is only a rear brake and seldom used.
Brian
|
|
|
|
Post by jazzkifli on May 19, 2023 5:42:42 GMT
|
|
|
|
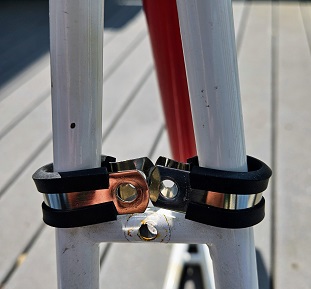
Post by brianbutler on May 19, 2023 11:00:50 GMT
I am using the R clamps you found. I guess it is a P after you tighten it! I have an assortment of these clamps and found that the 13mm size allows for enough tightening to hold the rack firmly. The clamp is actually deformed as you can almost see in my pictures.
I will try a 16mm clamp and see if it is tight enough.
Brian. |
|
|
|
Post by brianbutler on May 19, 2023 15:10:26 GMT
I did some experiments with the 16mm R clamp. Here are a few photos and descriptions: When fully compressed, the 16mm clamp leaves a gap. It has more friction that I thought it would, but it is still possible to slide it along the stay. 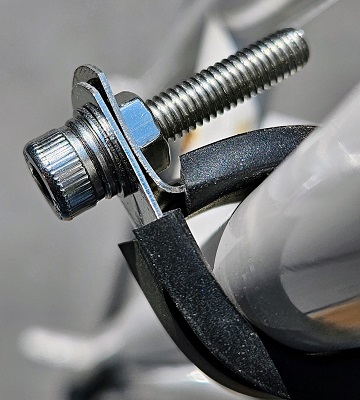 There are upper and lower limits on where the 16mm clamps can be placed without interfering with the stays and with each other There is a sweet spot where the clamp holes align. The chance that this will be the right height for a given combination of rack and frame seems slim.  There is still a gap but with two clamps bolted together it seems impossible to slide down. The rack would be mounted with only a center bolt, which might allow twisting.
Here is a different rack mounted to a Viscount Sebring using 16mm clamps. The stays are 16mm in diameter. It is secure because I was able to pull the tabs tight along the mounting rail. I just noticed that the rail is probably scratching the paint on the seat stay. I don't care but I thought I would mention it. 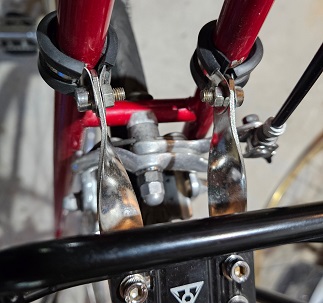 If you plan to carry heavy loads for long distances or bumpy roads, you probably need a better rack. The Pletscher is fine for carrying modest loads around town or credit card touring. Brian |
|
|
|
Post by jazzkifli on May 19, 2023 15:29:37 GMT
Hi Brian, Many thanks for your opinions. Would you then suggest a 13 mm clamp for the stay which is 16 mm? Yes, I would like to mount a Pletscher rack with a similar bag like this: VAUDE Radtaschen Silkroad L amzn.eu/d/8cekSp2I’m not going to long distances, maximum 30 km or so. I think the Pletscher with a right clamp would be nice. KR Viktor |
|
|
|
Post by brianbutler on May 19, 2023 19:18:19 GMT
Yes, I used the 13mm clamps on my Aerospace GP. It takes a bit of squeezing, bending, and fitting but I think it gives the best result. You will have to drill a couple of holes in the Pletscher rack mount. They will be spaced closer together than the factory holes. Regarding bags for the Pletscher rack, I went with a box instead:
Brian
|
|