|
|
Post by vtchuck on Oct 7, 2016 13:32:32 GMT
So my Viscount frame arrived yesterday. Bottom bracket bearings are shot. Real crunchy feeling.
So I'm going to to put in a thread less BB I have in my parts bin. So the question is... How do I remove the axle & bearings without
destroying the frame? I'd like to preserve the axle if possible and I know I can find replacement sealed bearings. Ideally I'd put it
on eBay & recover some of my costs.
So do just pop off the clips and start whacking it w/ a mallet?
Thanks for help
|
|
robt
Viscount

Posts: 559 
|
Post by robt on Oct 7, 2016 14:42:37 GMT
So my Viscount frame arrived yesterday. Bottom bracket bearings are shot. Real crunchy feeling. So I'm going to to put in a thread less BB I have in my parts bin. So the question is... How do I remove the axle & bearings without destroying the frame? I'd like to preserve the axle if possible and I know I can find replacement sealed bearings. Ideally I'd put it on eBay & recover some of my costs. So do just pop off the clips and start whacking it w/ a mallet? Thanks for help When I removed the b/b bearings from my Sport, my efforts to reduce the amount of brute force required went something like: 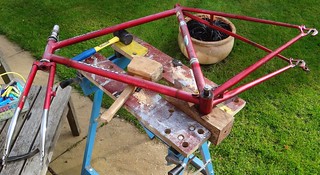 Untitled Untitled by RMT@261, on Flickr a. Remove circlips from axle grooves then, for each bearing; b. Remove (tear off) the rubbery seals on the outside of bearings and wipe out the grease beneath them to expose the bearing cages c. Using a 2 or 2.5mm drill bit, drill out the 'ligaments' of the bearing cages between the ball bearings so that the cages fall apart in situ. Hint: it's good to have some spare drill bits available. d. Using a pair of thin-nosed pliers, remove/tug/pull/rip the bits of bearing cage out from between the bearing races and around the balls. Things should loosen up a bit now. e. Wiggle the axle and push the balls around between the races until they start to fall out (the first one on each side is the trickiest, the rest then follow). Some poking and prodding may be required. f. When all the balls have been removed from between the races, you should be able to remove the axle with the inner races still attached, leaving the outer races in the b/b shell g. Use a hammer and drift (screwdriver, 4"+ bolt etc) though one side of the b/b to gently(?) tap around the inside of the outer race on the other side of the b/b shell until it falls out. Be careful not to allow the drift to score the inside of the b/b shell. h. Turn the frame over and repeat as above for the other outer race. i. The b/b shell should now be clear (except for the tube spigots, which might get in the way of a threadless b/b, in which case see rmw's advice on having her b/b shell reamed out & threaded to take a conventional sealed unit b/b): 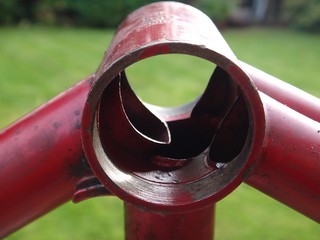 Untitled Untitled by RMT@261, on Flickr j. Place axle loosely in a bench vice, resting vertically on one of the inner races. Screw axle nut into threaded hole in square taper, then gently(?) tap the axle nut until the axle falls out of the inner race and the vice. (Hint:Soaking the axle/race interface for a couple of days with a penetrating oil such as Plus-Gas may be useful if the race doesn't move at the first attempt.) k. Pick axle up off the floor, replace in vice the other way up and repeat as j above. l. Remove stem and forks from frame 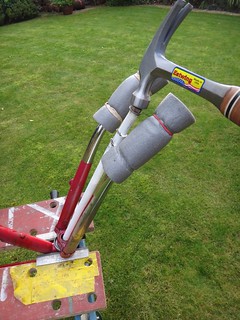 Untitled Untitled by RMT@261, on Flickr m. Tidy up collection of debris. 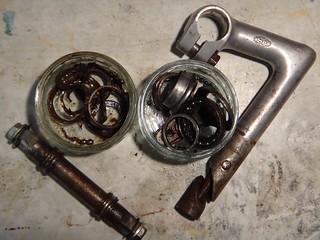 Untitled Untitled by RMT@261, on Flickr n. Wash hands and apply band-aid/sticking plasters to injured body parts. o. Send the frame away to be resprayed  Untitled Untitled by RMT@261, on Flickr p. Store the frame under a sheet for 12 months, waiting for the right time to put it all back together again. |
|
Jem
Viscount
?
Posts: 3,390
|
Post by Jem on Oct 7, 2016 15:32:47 GMT
Well, I will recount what I did but not recommend it. I did it on a frame with a stuck seat post and the frame wasn't an amazing specimen either. (so, It was a case of kill or cure)
I soaked it all in PlusGas then I followed RobT's method step 'a' removing circlips. Then my step 'b'.. I buffered bike up against my thighs and hit the end of the axle very hard...nothing happened...step 'c', I got a much heavier hammer, lay it down on top on something and hit it really really hard...
The axle flew out at great speed and brown soupy Plus Gas and rusty goop went everywhere.
The axle seemed unmarked and the BB was undamaged and went on to a fellow member here who did the upgrade.
I can't remember which side I hit...if that makes any difference?
|
|
|
|
Post by vtchuck on Oct 7, 2016 20:26:48 GMT
Thanks Sooper & Robt:
I carefully considered both of your experiences. I removed the two clips (not easy) and the bearing covers. Before I started drilling, I put the frame in my repair vise, supported the frame
and gave the axle a modest tap with a wooden mallet. It budged....and with the second tap came flying out along with the bearing! Used an old alloy seat post to tap out the other bearing.
Once I found the right grinding stone, it was short work to grind down the protruding tubes inside the BB. Popped in the YST thread less assembly & I'm good to go.
I now have an axle, clips & chrome bolts. I'll add a new set of bearings and see how it goes on eBay.
At that point, I cleaned up and poured a couple of pints of my Best Bitter to celebrate. Cheers!
|
|
|
|
Post by velocipete on Oct 8, 2016 6:20:43 GMT
When I put a threadless bb in my Sport frame,I found that it slackened off after a time.
I've used Loctite on the threads,and tightened using 2 bb tools. It's fine thus far.
The beauty of doing this conversion is that you can use any crankset you want.
Cheers,
Pete.
|
|
|
|
Post by vtchuck on Oct 8, 2016 15:51:19 GMT
When I put a threadless bb in my Sport frame,I found that it slackened off after a time. I've used Loctite on the threads,and tightened using 2 bb tools. It's fine thus far. The beauty of doing this conversion is that you can use any crankset you want. Thanks for the reminder re: Loctite. It was recommended in the instructions for my Velo Orange BB, but not for the YST. Did you use a tapered type of BB? I'm wondering if others using a tapered type beveled the edges of the BB for a more secure fit. I didn't have a second tool, but found the pins on a standard BB tool fit nicely into the notches and held the side in place while tightening. I'll be using a 175mm NOS Specialized crankset that has been hanging in my work area for a couple of years. |
|
|
|
Post by velocipete on Oct 8, 2016 17:05:01 GMT
I didn't bevel the inner edges of the bb shell,I would have done if I had access to the correct tools.
However,all seems ok so far. I'm using an old Stronglight chainset that allows a sensible inner ring
to match my advancing years!Hope it goes well for you.
Cheers,
Pete.
|
|
|
|
Post by thechatterboxman on Oct 16, 2016 6:56:54 GMT
Thanks Sooper & Robt: I carefully considered both of your experiences. I removed the two clips (not easy) and the bearing covers. Before I started drilling, I put the frame in my repair vise, supported the frame and gave the axle a modest tap with a wooden mallet. It budged....and with the second tap came flying out along with the bearing! Used an old alloy seat post to tap out the other bearing. Once I found the right grinding stone, it was short work to grind down the protruding tubes inside the BB. Popped in the YST thread less assembly & I'm good to go. I now have an axle, clips & chrome bolts. I'll add a new set of bearings and see how it goes on eBay. At that point, I cleaned up and poured a couple of pints of my Best Bitter to celebrate. Cheers! |
|
|
|
Post by jazzkifli on Apr 17, 2023 9:53:00 GMT
So my Viscount frame arrived yesterday. Bottom bracket bearings are shot. Real crunchy feeling. So I'm going to to put in a thread less BB I have in my parts bin. So the question is... How do I remove the axle & bearings without destroying the frame? I'd like to preserve the axle if possible and I know I can find replacement sealed bearings. Ideally I'd put it on eBay & recover some of my costs. So do just pop off the clips and start whacking it w/ a mallet? Thanks for help When I removed the b/b bearings from my Sport, my efforts to reduce the amount of brute force required went something like: Untitled by RMT@261, on Flickr a. Remove circlips from axle grooves then, for each bearing; b. Remove (tear off) the rubbery seals on the outside of bearings and wipe out the grease beneath them to expose the bearing cages c. Using a 2 or 2.5mm drill bit, drill out the 'ligaments' of the bearing cages between the ball bearings so that the cages fall apart in situ. Hint: it's good to have some spare drill bits available. d. Using a pair of thin-nosed pliers, remove/tug/pull/rip the bits of bearing cage out from between the bearing races and around the balls. Things should loosen up a bit now. e. Wiggle the axle and push the balls around between the races until they start to fall out (the first one on each side is the trickiest, the rest then follow). Some poking and prodding may be required. f. When all the balls have been removed from between the races, you should be able to remove the axle with the inner races still attached, leaving the outer races in the b/b shell g. Use a hammer and drift (screwdriver, 4"+ bolt etc) though one side of the b/b to gently(?) tap around the inside of the outer race on the other side of the b/b shell until it falls out. Be careful not to allow the drift to score the inside of the b/b shell. h. Turn the frame over and repeat as above for the other outer race. i. The b/b shell should now be clear (except for the tube spigots, which might get in the way of a threadless b/b, in which case see rmw's advice on having her b/b shell reamed out & threaded to take a conventional sealed unit b/b): Untitled by RMT@261, on Flickr j. Place axle loosely in a bench vice, resting vertically on one of the inner races. Screw axle nut into threaded hole in square taper, then gently(?) tap the axle nut until the axle falls out of the inner race and the vice. (Hint:Soaking the axle/race interface for a couple of days with a penetrating oil such as Plus-Gas may be useful if the race doesn't move at the first attempt.) k. Pick axle up off the floor, replace in vice the other way up and repeat as j above. l. Remove stem and forks from frame Untitled by RMT@261, on Flickr m. Tidy up collection of debris. Untitled by RMT@261, on Flickr n. Wash hands and apply band-aid/sticking plasters to injured body parts. o. Send the frame away to be resprayed Untitled by RMT@261, on Flickr p. Store the frame under a sheet for 12 months, waiting for the right time to put it all back together again. Hi Robt, Many-many thanks for this very nice tutorial! With this I was able to gentle remove my spindle from my '74 Aerospace GP :-) I have a question: have you any idea, which intense of polishing should I use by the bearing surface in the BB shell? Many thanks in advance Viktor |
|
robt
Viscount
Posts: 559
|
Post by robt on Apr 17, 2023 11:42:10 GMT
I assume you’ve been able to cut out the ends of the seat-tube, downtube and chain stays that are visible in the bottom bracket shell. I used a fretsaw and a Dremel tool to make space for the cartridge b/b to fit into the shell, then painted the cut tube ends to provide some corrosion control.
As part of that, I rubbed down the b/b shell bearing faces with some fine wet & dry sandpaper, just to the point that the faces felt smooth to my fingers. The threadless bottom brackets that I used have a slight taper on the bearing faces to assist centring. It’s worth remembering that you will need two of the splined b/b tools to fit the threadless unit.
Good luck!
|
|
|
|
Post by jazzkifli on Apr 17, 2023 12:07:46 GMT
Honestly, I don't want to change the crankset. I think this original spindle and all chainrings are in a quite good shape. The new bearings are also arrived. I ordered a Dremel 8220, arrives this week.
When I don't want to change the BB System, should I cut the tube ends?
Thanks for the rubbing advice :-)
KR
Viktor
|
|
robt
Viscount
Posts: 559
|
Post by robt on Apr 18, 2023 0:39:07 GMT
Viktor,
Sorry, I hadn’t realised you were planning to replace the bearings and re-fit the original spindle (I was probably still thinking of Vtchuck’s post from 2016 that mentioned a thread less b/b). If so, you don’t need to remove the tube ends in the b/b shell. I’m probably not the one to ask, as I only tried to do that once (on my Victor) and ended up ruining the spindle and, subsequently, the crankset. The advice I can offer, based on that experience, is to avoid becoming so impatient with things that you hit the end of the spindle directly with a metal hammer, as the spindle material is softer than the hammer’s.
If you search this forum for old posts by Busaste, there might be some tips from him that include a custom press tool and lot of very gentle pressing and tapping if I recall correctly. Has anyone had more luck (or skill) than me to replace b/b bearings and the original spindle?
|
|


